Embrace a new era of note-taking as you can now generate live transcriptions in iOS 18, iPadOS 18, and macOS Sequoia. No more frantic scribbling or missed details in lectures, meetings, or interviews. Let your devices do the heavy lifting, capturing every word and allowing you to focus on the discussion at hand.
Whether you’re in a lecture, a meeting, or an interview, live transcriptions are your versatile companion. This guide will show you how to unlock this powerful feature, allowing you to adapt your note-taking process to any situation and never miss a key point.
System requirements to generate live transcriptions
Generating live transcriptions on your Apple devices requires specific hardware and software configurations to ensure smooth functionality. Ensuring your device meets these requirements will provide the best experience and performance when using live transcriptions. Below are the system requirements for iOS 18, iPadOS 18, and macOS Sequoia:
iOS 18
To use live transcriptions on iOS 18, you’ll need a relatively recent iPhone model. Additionally, having the latest software and a few other essentials will ensure you can seamlessly enable and use this feature.
Supported devices:
- iPhone 12 and later
- iPhone SE (3rd generation) and later
Software requirements: iOS 18 or later
Additional requirements:
- Active internet connection for initial setup and updates
- iCloud account (for syncing and backup purposes)
- Microphone access
Also read: How to use Genmoji on iOS 18.
iPadOS 18
For iPad users, live transcriptions are available on a variety of models, particularly the more recent ones. Ensure your iPad is updated to the latest iPadOS and meets the necessary additional requirements to enjoy this feature.
Supported devices:
- iPad Pro (all models)
- iPad Air (4th generation) and later
- iPad (8th generation) and later
- iPad mini (6th generation) and later
Software requirements: iPadOS 18 or later
Additional requirements:
- Active internet connection for initial setup and updates
- iCloud account (for syncing and backup purposes)
- Microphone access
macOS Sequoia
Mac users can also benefit from live transcriptions with the latest macOS Sequoia. Ensuring your Mac meets the hardware and software requirements and the necessary additional settings will provide a smooth and efficient transcription experience.
Supported devices:
- MacBook (2017 and later)
- MacBook Air (2018 and later)
- MacBook Pro (2017 and later)
- iMac (2017 and later)
- iMac Pro (all models)
- Mac mini (2018 and later)
- Mac Pro (2019 and later)
Software requirements: macOS Sequoia or later
Additional requirements:
- Active internet connection for initial setup and updates
- iCloud account (for syncing and backup purposes)
- Microphone access
General tips
A few general tips will help you ensure the best experience with live transcriptions. These tips will also help you maintain optimal performance and stay updated with the latest features and improvements.
- Ensure your devices have sufficient battery life or are connected to a power source during the setup and use of live transcription features.
- Keep your device’s software updated to the latest version to ensure compatibility and access to the latest features and improvements.
- Regularly check for updates in the Settings app on iOS and iPadOS devices and in System Preferences on macOS devices.
Also read: How to turn off AirPlay on your Apple device.
How to enable live transcriptions on your Apple device
To start using live transcriptions, you need to enable the feature on your device. The setup process is straightforward and involves a few simple steps. Here’s a brief overview of what you’ll be doing:
Enable live transcriptions on iOS 18 and iPadOS 18
1. Tap on the Settings icon on your home screen.
2. Scroll down and select Accessibility.
3. Under the Hearing section, tap on Live Transcriptions.
4. Toggle the switch to enable Live Transcriptions.
Enable live transcriptions on macOS Sequoia
1. Click on the Apple logo in the top left corner and select System Preferences.
2. Select Accessibility in the System Preferences window.
3. In the left sidebar, find and click on Live Transcriptions under the Hearing section.
4. Check the box to enable Live Transcriptions.
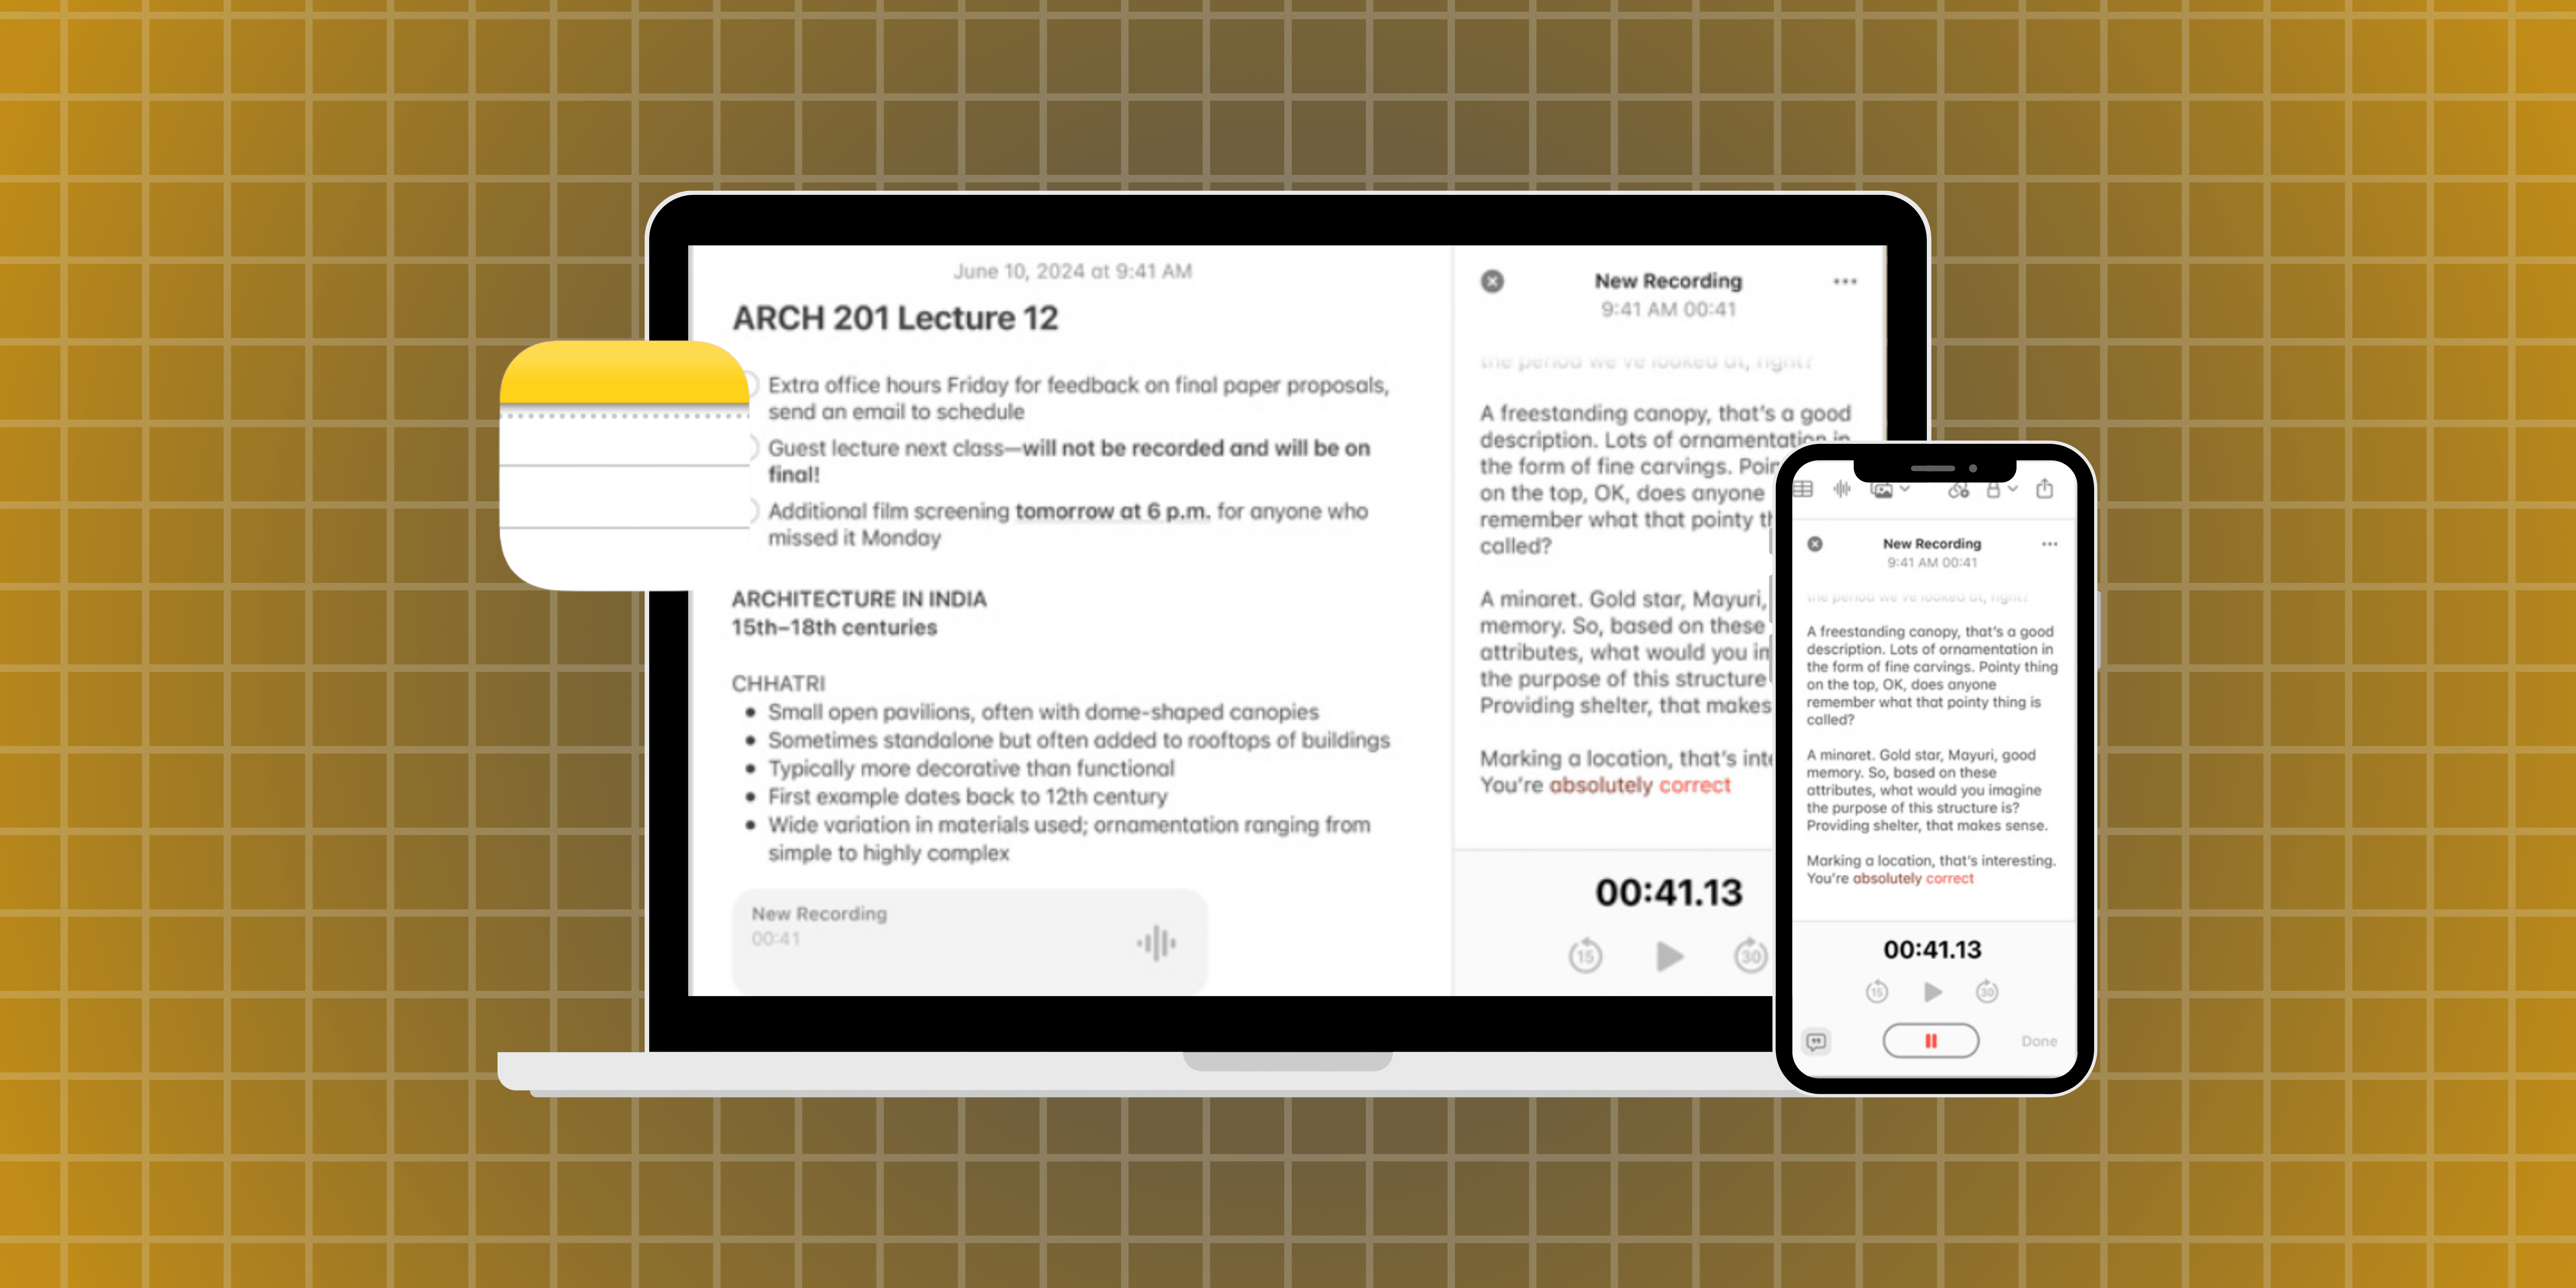
How to use live transcriptions on your Apple devices
Live Transcriptions are designed with your comfort in mind. Once enabled, you can effortlessly transcribe conversations, meetings, or audio input. It’s as simple as a few taps or voice commands, making the process comfortable and intuitive.
Using live transcriptions in iOS 18 and iPadOS 18
1. Hold down the Power button or say “Hey Siri” to activate Siri.
2. Say “Start Live Transcription” to Siri.
3. A transcription interface will appear on your screen, capturing and displaying spoken words in real-time.
Using live transcriptions in macOS Sequoia
1. Press Command + Space to open Spotlight.
2. Type “Live Transcriptions” and hit Enter.
3. The Live Transcription interface will open and be ready to capture and display spoken words.
Also read: How to use Live Voicemail on iPhone.
Advanced features of live transcriptions on your Apple device
Apple has packed some nifty features into the live transcriptions tool. These advanced features enhance the usability and accuracy of the transcriptions:
- Custom vocabulary: Add specific terms or names to ensure they are transcribed correctly. Go to Settings > Accessibility > Live Transcriptions > Custom Vocabulary.
- Highlighting: Important phrases or keywords can be highlighted automatically. Enable this in Settings > Accessibility > Live Transcriptions > Highlight Keywords.
- Export transcriptions: Save or share your transcriptions by tapping the Share button in the transcription interface. You can send them via email, save them to Files, or share them through any other app.
Take notes with ease!
Generating live transcriptions on iOS 18, iPadOS 18, and macOS Sequoia is a breeze. This versatile feature not only enhances accessibility but also boosts productivity by keeping a real-time record of your conversations. From meetings to lectures, the ability to generate live transcriptions ensures you never miss a word. So go ahead, enable this feature, and experience the convenience and adaptability of live transcriptions on your Apple devices.
FAQs
Q. Can I use live transcriptions without an internet connection?
No, live transcriptions require an active internet connection to process and display the transcriptions in real time.
Q. Are live transcriptions available in multiple languages?
Currently, live transcriptions support multiple languages, but the availability may vary based on your device’s language settings and region. Check Settings > General > Language & Region for supported languages.
Q. How accurate are the live transcriptions?
The accuracy of live transcriptions depends on the clarity of speech and background noise. For best results, speak clearly and minimize background noise.
Q. Can I customize the appearance of the transcription text?
Yes, you can adjust the font size, color, and background color in Settings > Accessibility > Live Transcriptions > Appearance.
Q. Do live transcriptions work with all apps?
Live transcriptions can capture spoken words from most apps, but performance may vary. It’s designed to work seamlessly with native Apple apps and widely used communication platforms.
Was this helpful?
Introducing Bhaskar, your tech-savvy neighbor turned wordsmith extraordinaire. Over the past few years, Bhaskar has become the trusted authority for unraveling the mysteries of iOS, Android, macOS, and Windows. Armed with a B.Tech degree, he has dedicated himself to making technology easy to understand for everyone. His expertise shines through his contributions to well-known publications like Guiding Tech, iGeeksBlog, GeekFrost, and MakeUseOf (MUO). Bhaskar excels in creating straightforward how-to guides and comprehensive articles that make the complex tech landscape accessible to all. When he's not diving into the tech world, you'll find him enjoying music or indulging in sports.