One of the standout features introduced at WWDC 24 is Genmoji, a revolutionary tool that enhances your emoji experience by allowing you to create custom emojis based on text descriptions. This guide will show you how to use Genmoji on iOS 18, ensuring you get the most out of this fun new feature.
Imagine you’re in a lively group chat and need just the right emoji to convey your excitement about a blue dragon with sunglasses. Regular emojis won’t cut it, but you know exactly how to use Genmoji on iOS 18 to create the perfect, personalized emoji.
Understanding Genmoji
Genmoji, a cutting-edge feature in iOS 18, generates custom emojis from your text descriptions. Imagine describing a whimsical character or a unique object and watching it transform into a distinct emoji. Integrated seamlessly into the Messages app, Genmoji elevates your conversations, making them more vibrant and expressive.
Also read: How to schedule a text message on iPhone.
Key features of Genmoji
Below are some of the key features of Genmoji:
- Text-Based Customization: Create unique emojis from descriptive text.
- Seamless Integration: Easily use Genmoji within the Messages app.
- Personal Expression: Tailor emojis to reflect your personal style and creativity.
Getting started with Genmoji
Before you start creating your Genmoji, ensure your device is updated to iOS 18. If you’re unsure about the update process, refer to our detailed guide on installing iOS 18 in developer mode.
Update your iPhone
1. Open the Settings app.
2. Navigate to General and head to Software Update.
3. Follow the on-screen instructions to install iOS 18.
Also read: How to use text effects in iMessage.
Create your Genmoji
Generating a Genmoji is straightforward and intuitive. Follow these steps to create your personalized emojis:
1. Open the Messages app on your iPhone.
2. Tap on an existing conversation or start a new message.
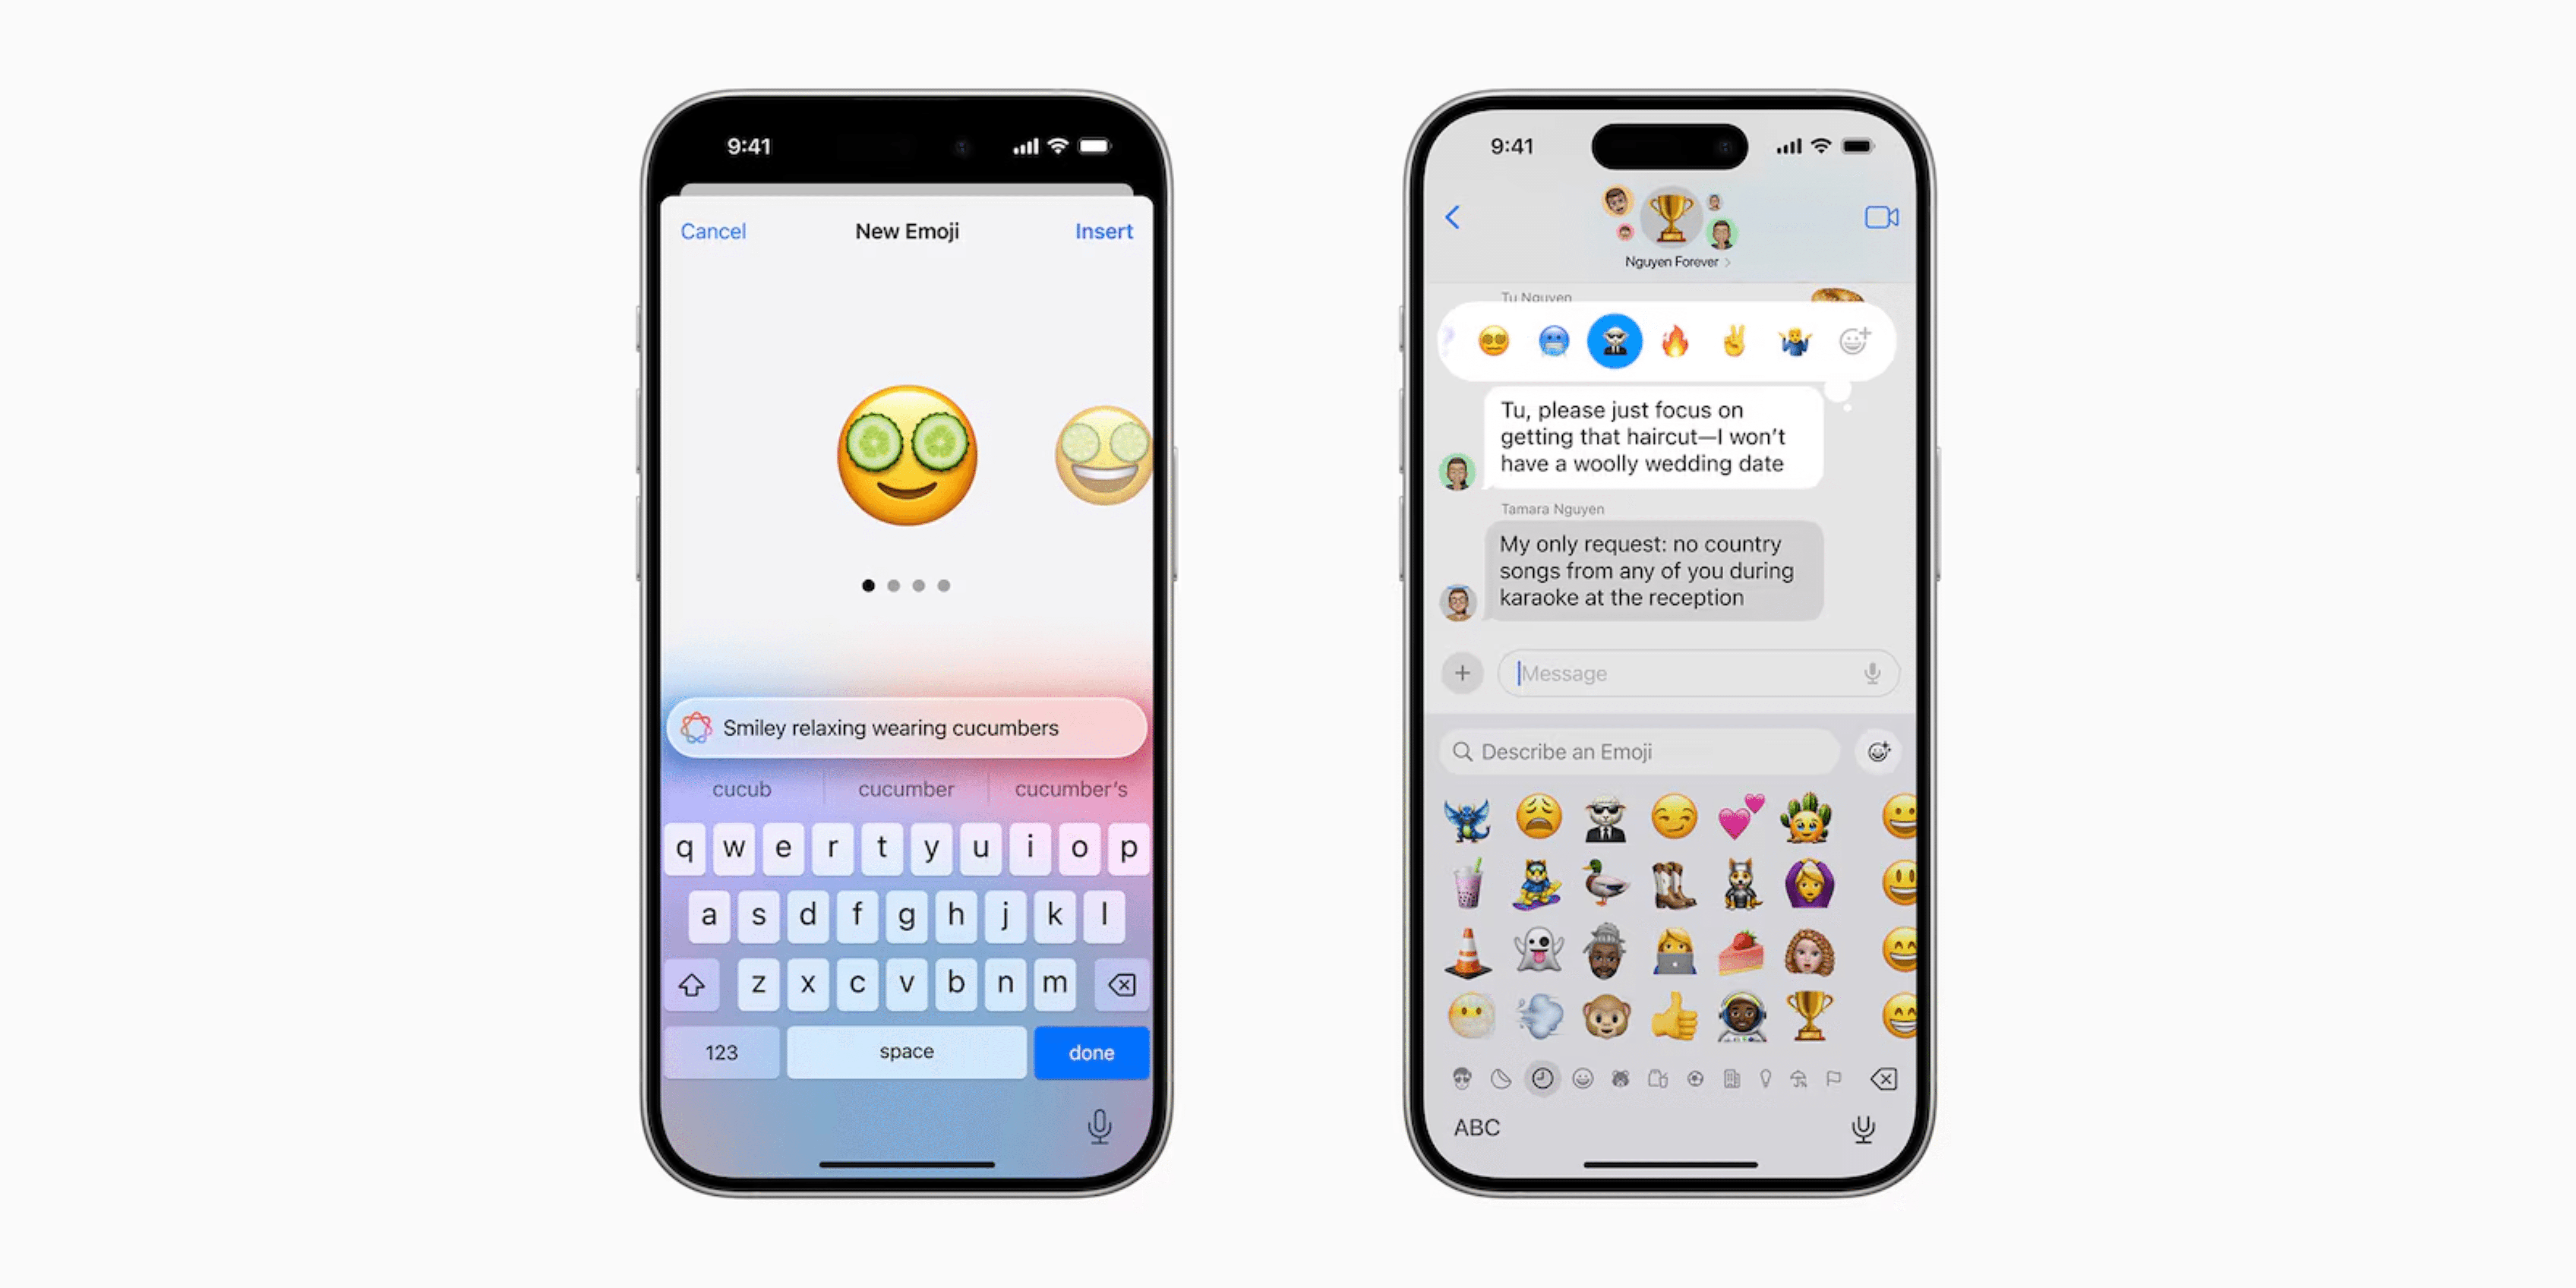
3. Begin typing a description of what you want your Genmoji to represent in the text field (e.g., “A blue dragon with sunglasses”).
4. A prompt will appear, indicating your Genmoji is being created.
5. After a few seconds, multiple iterations of your new emoji will be displayed. Swipe through the options and tap Insert on the one you prefer.
Using Genmoji in Messages
Incorporating Genmoji into your messages is simple and adds a unique flair to your conversations. Here’s how you can make the most of it:
- Sending Genmoji: Select the desired Genmoji and insert it into your message thread.
- Reacting with Genmoji: Use your custom Genmoji to react to messages, offering a more personalized touch to your responses.
Also read: How to hide alerts in Messages app on iPhone.
Tips and tricks to use Genmoji on iOS 18
Maximize your Genmoji experience with these expert tips and troubleshooting advice:
- Be Creative: The more detailed and imaginative your descriptions, the more unique and interesting your Genmoji will be.
- Use Variations: Try different variations of descriptions to see how Genmoji interprets them differently.
- Save Favorites: Keep a collection of your favorite Genmojis for quick access.
Troubleshooting Genmoji on iOS 18
If you’re facing any issues with the Genmojies, here are some of the most common fixes to get it running:
- Common Issues: If your Genmoji is not appearing or there are syncing problems, try restarting the Messages app or ensuring your iOS is up to date.
- Clear Cache: If Genmoji generation is slow, clearing the cache might help speed things up.
- Network Connection: Ensure you have a stable internet connection, as Genmoji creation may require it.
Also read: How to send a message to yourself in iMessage on your iPhone.
Interactive message!
Genmoji in iOS 18 is a game-changer for personalizing your messaging experience. The possibilities are boundless, from creating custom emojis to using them in animated forms and video calls. Experiment with different descriptions and let your creativity shine through your personalized Genmoji. Now that you know how to use Genmoji on iOS 18, share your favorite creations and experiences with us, and stay tuned for more exciting updates and features.
FAQs
Q. Can I edit a Genmoji after creating it?
Currently, once a Genmoji is created, it cannot be edited. You will need to create a new one with your desired adjustments.
Q. Are there any limits to the descriptions I can use?
While Genmoji supports a wide range of descriptions, highly complex or abstract descriptions may not generate the desired emoji.
Q. Can I share my Genmoji with friends using different devices?
Yes, you can share Genmojis in messages, and they will appear as images on devices that do not support Genmoji.
Q. How do I delete a Genmoji?
To delete a Genmoji, simply long-press on the Genmoji in your Messages app and select Delete from the menu that appears.
Q. Can I use Genmoji in other apps?
Currently, Genmoji is designed to be used primarily within the Messages app. However, you can copy and paste Genmojis as images into other apps.
Was this helpful?
Introducing Bhaskar, your tech-savvy neighbor turned wordsmith extraordinaire. Over the past few years, Bhaskar has become the trusted authority for unraveling the mysteries of iOS, Android, macOS, and Windows. Armed with a B.Tech degree, he has dedicated himself to making technology easy to understand for everyone. His expertise shines through his contributions to well-known publications like Guiding Tech, iGeeksBlog, GeekFrost, and MakeUseOf (MUO). Bhaskar excels in creating straightforward how-to guides and comprehensive articles that make the complex tech landscape accessible to all. When he's not diving into the tech world, you'll find him enjoying music or indulging in sports.