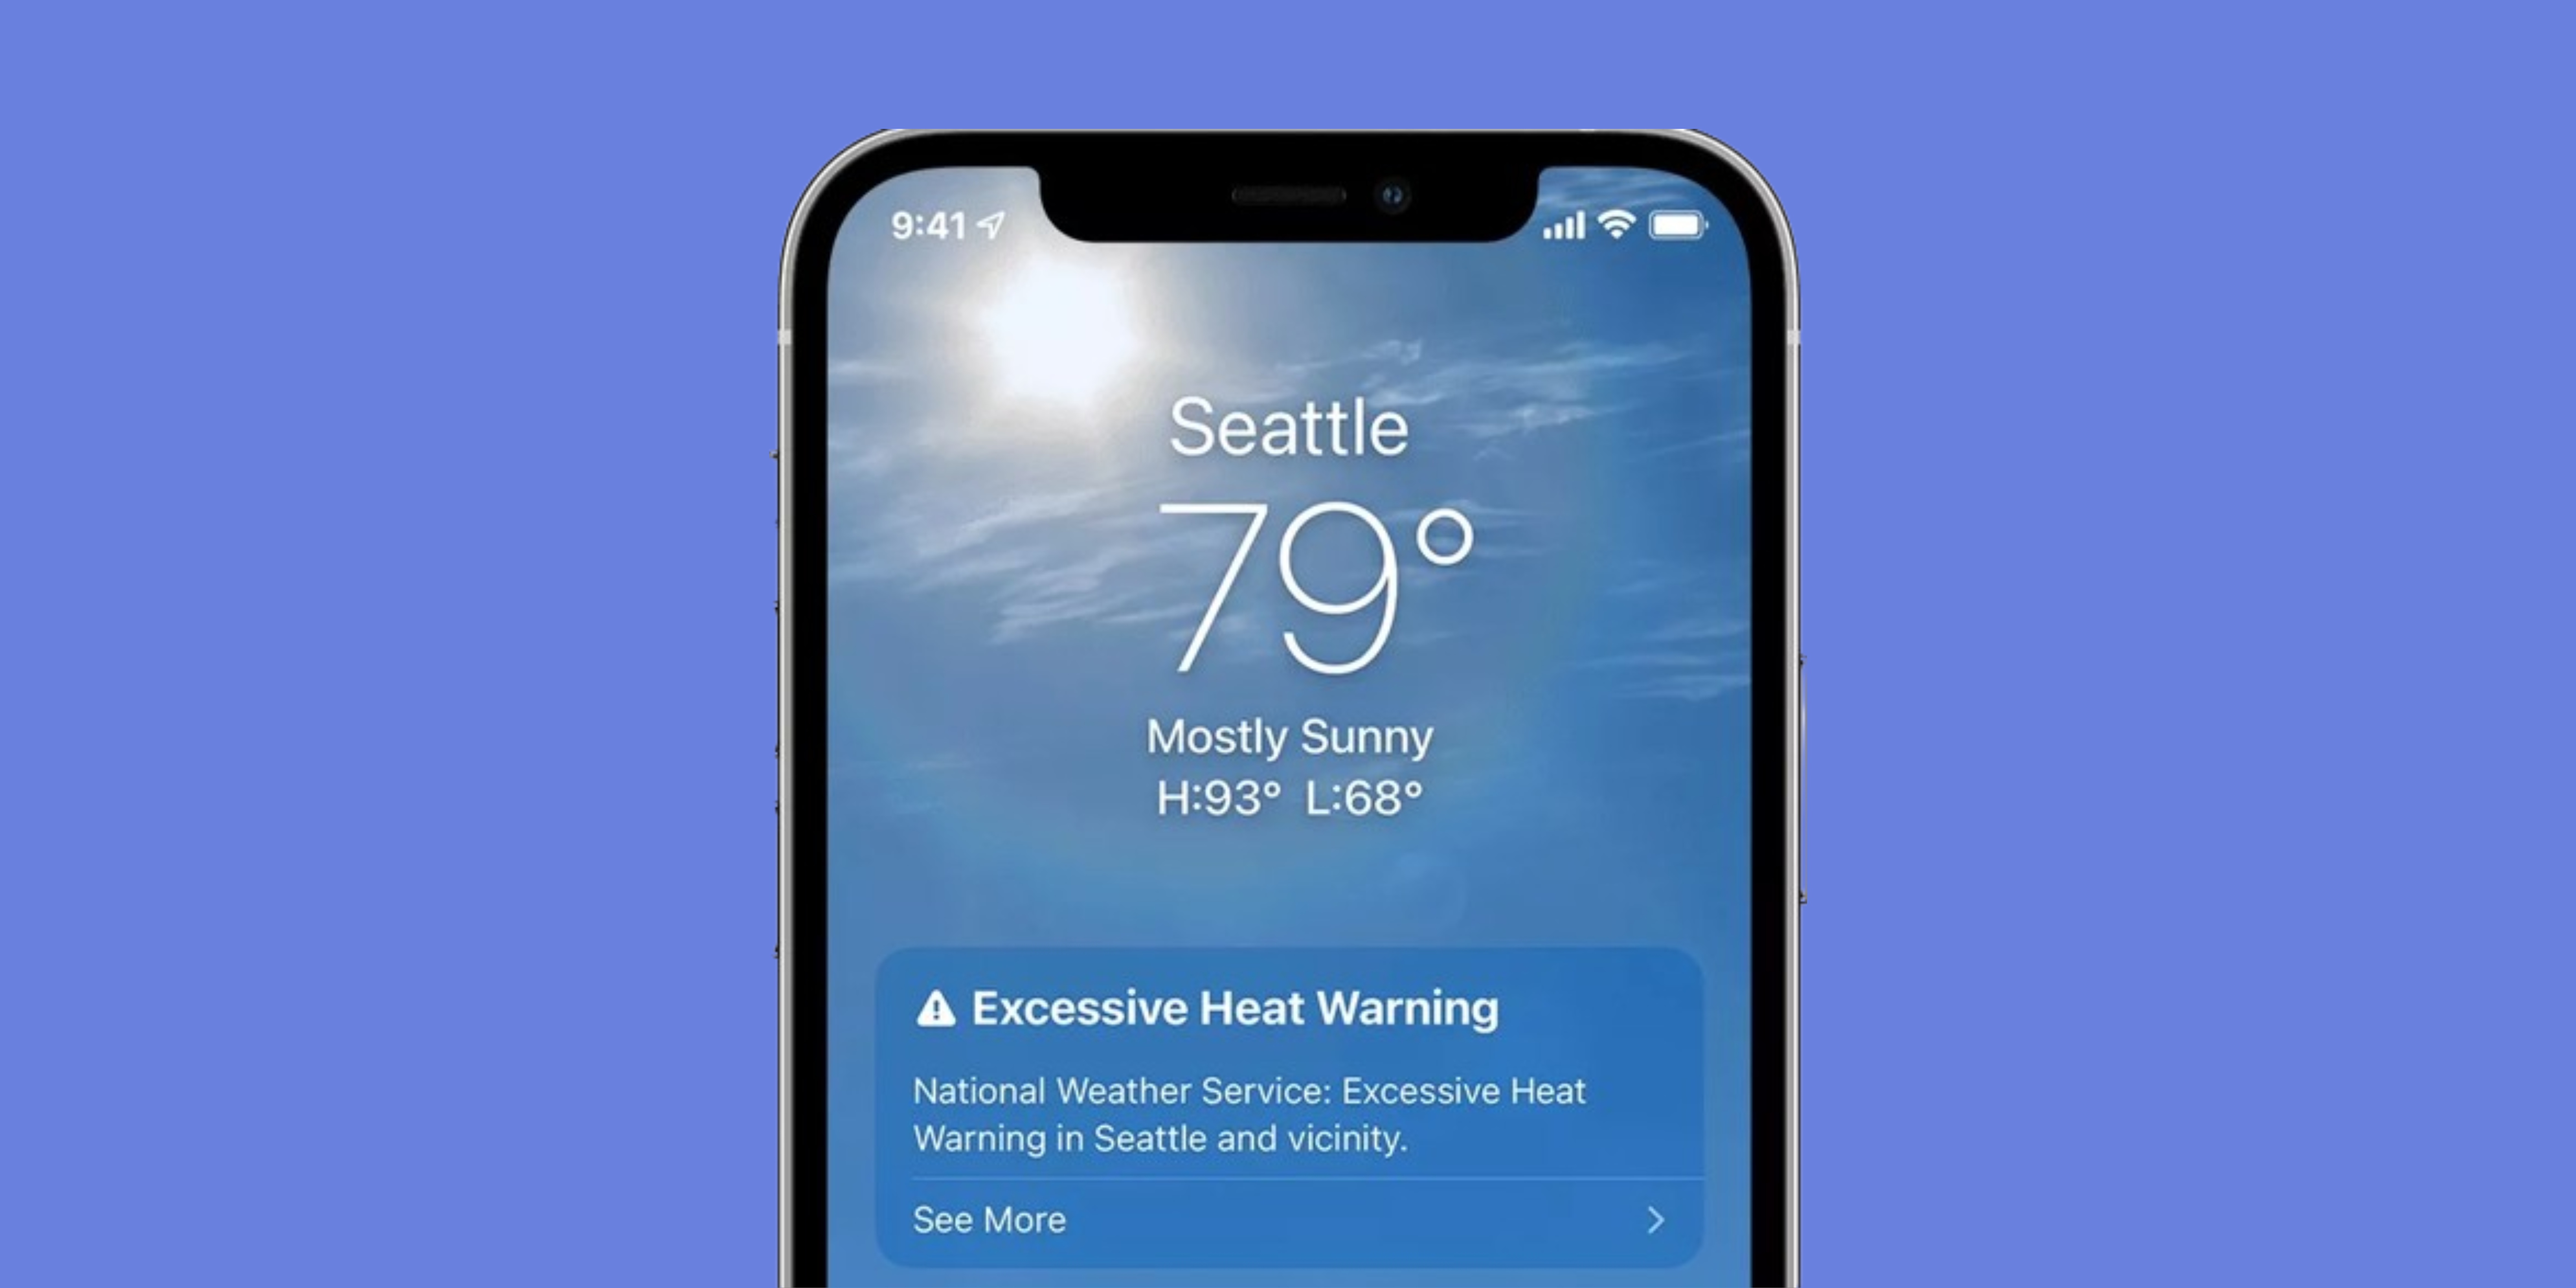
I remember the sinking feeling when I stepped out of the office, completely unprepared for the downpour that greeted me. Just moments earlier, the weather looked promising, with a bright sun shining in the sky. If only I’d had weather alerts on my device, I could have grabbed an umbrella and avoided getting soaked! In this article, I’ll walk you through the steps to set up weather alerts on your iPhone or iPad to help you avoid such a situation.
Why should you turn on weather alerts on your iPhone?
Weather alerts on your iPhone are built-in notifications from the Weather app that keep you informed about potentially dangerous conditions. They empower you to stay informed and prepared for a variety of situations. Here’s how they can be helpful to different people in different scenarios:
- For the outdoor enthusiast: Imagine you’re halfway through a scenic hike when a sudden downpour threatens to turn the trail into a mudslide. With weather alerts on your iPhone, you’ll receive timely warnings about approaching storms, allowing you to adjust your plans and reach safety before the weather takes a turn for the worse.
- For the busy professional: Traffic jams aren’t the only thing that can disrupt your morning commute. Severe weather can cause road closures, delays, and even power outages. Building on the peace of mind weather alerts provide, they can give you a heads-up on what to expect, allowing you to leave earlier, work from home, or adjust your schedule to avoid any weather-related hassles.
- For the peace-of-mind seeker: Unexpected weather events can be stressful, especially if you’re caught unprepared. Weather alerts provide a sense of security by keeping you informed about potential dangers. Knowing what’s coming allows you to take proactive steps, like securing outdoor furniture or stocking up on essentials, before the storm hits.
Also read: Best video player apps for iPhone and iPad.
Enable location services for the Weather app
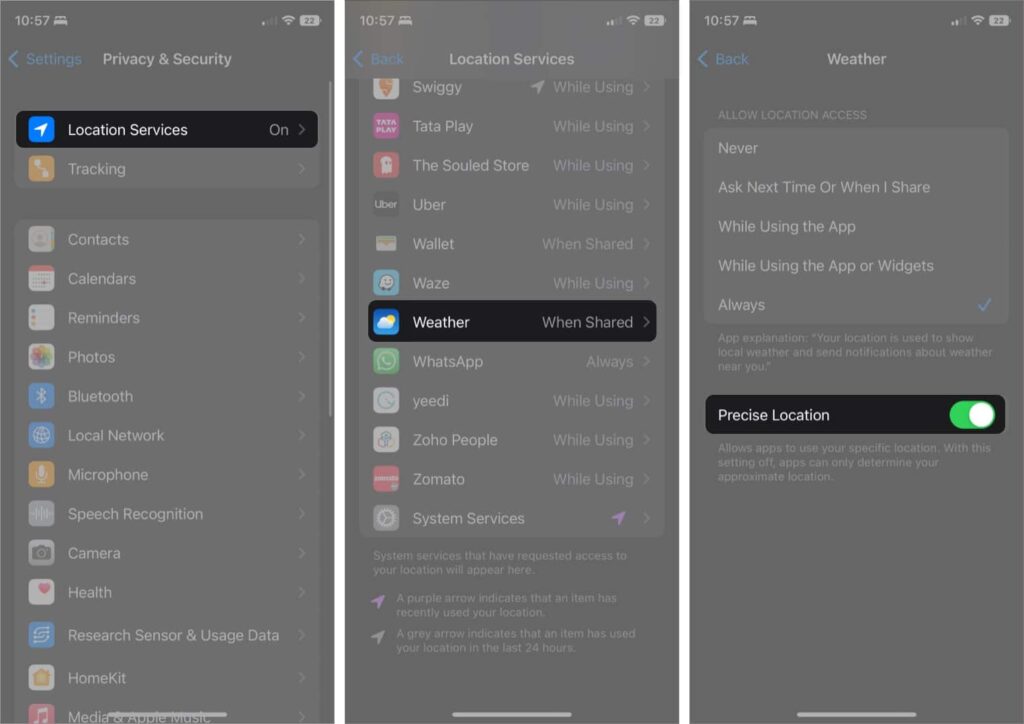
Ensure that you’ve activated Location Services in the Weather app on your iPhone or iPad prior to configuring weather notifications. The active Location Services on your Weather app ensure precise location tracking, allowing the app to locate you precisely so that it can provide you with localized weather updates and notifications. Follow the steps outlined below to enable or verify if the location services are activated on your device’s Weather app:
1. Launch your device’s Settings app (gear icon).
2. Look for Privacy & Security in the settings menu.
3. Tap on Location Services and make sure the switch next to Location Services is turned on (it should be green).
4. Now, head to the Weather app on your device, and under the Allow Location Access section, choose one of the following options:
- While Using the App
- While Using the App or Widgets
- Always
5. Ensure that you toggle on the button next to Precise Location for the Weather app.
Note: Enabling Precise Location allows the app to access your exact location for accurate weather information.
Also read: How to change SIM PIN on iPhone.
How to turn on weather alerts on an iPhone
Now that you’ve confirmed that the Weather app’s location services are turned on let’s make sure you’re ready for any potentially severe weather conditions. Follow the instructions below, depending on the locations you would like to get notifications for:
For the current location
1. Navigate to the Weather app on your device.
2. At the bottom right corner of the screen, press the bullet list icon.
3. From the top right corner of the screen, tap the three dots icon and choose Notifications.
4. Give the Weather app permission to send you notifications by selecting Continue.
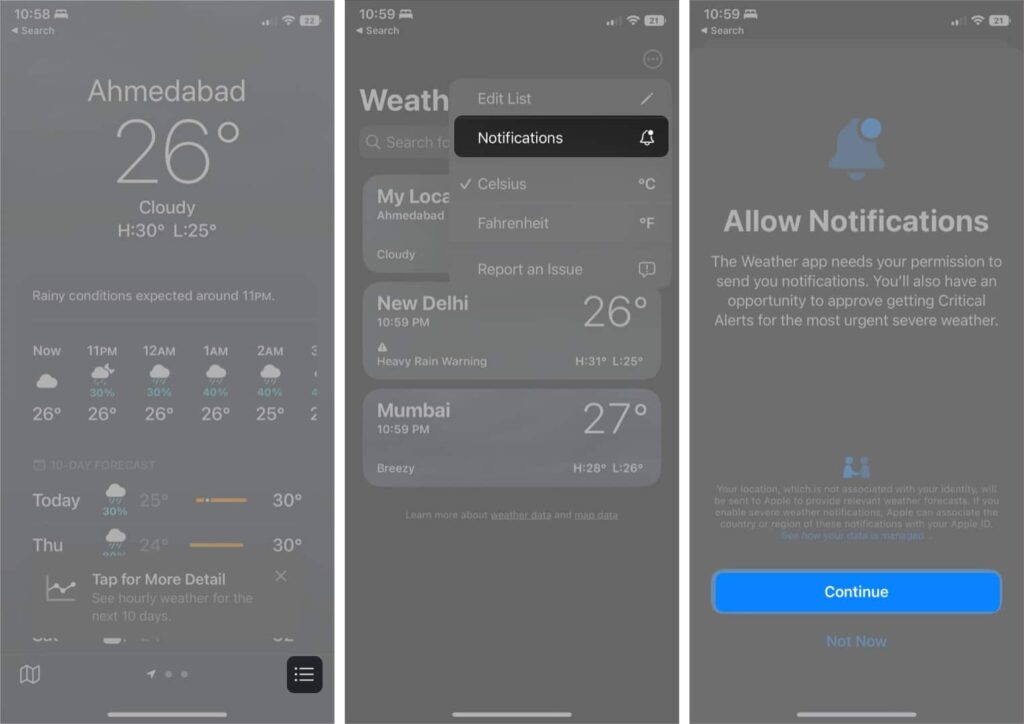
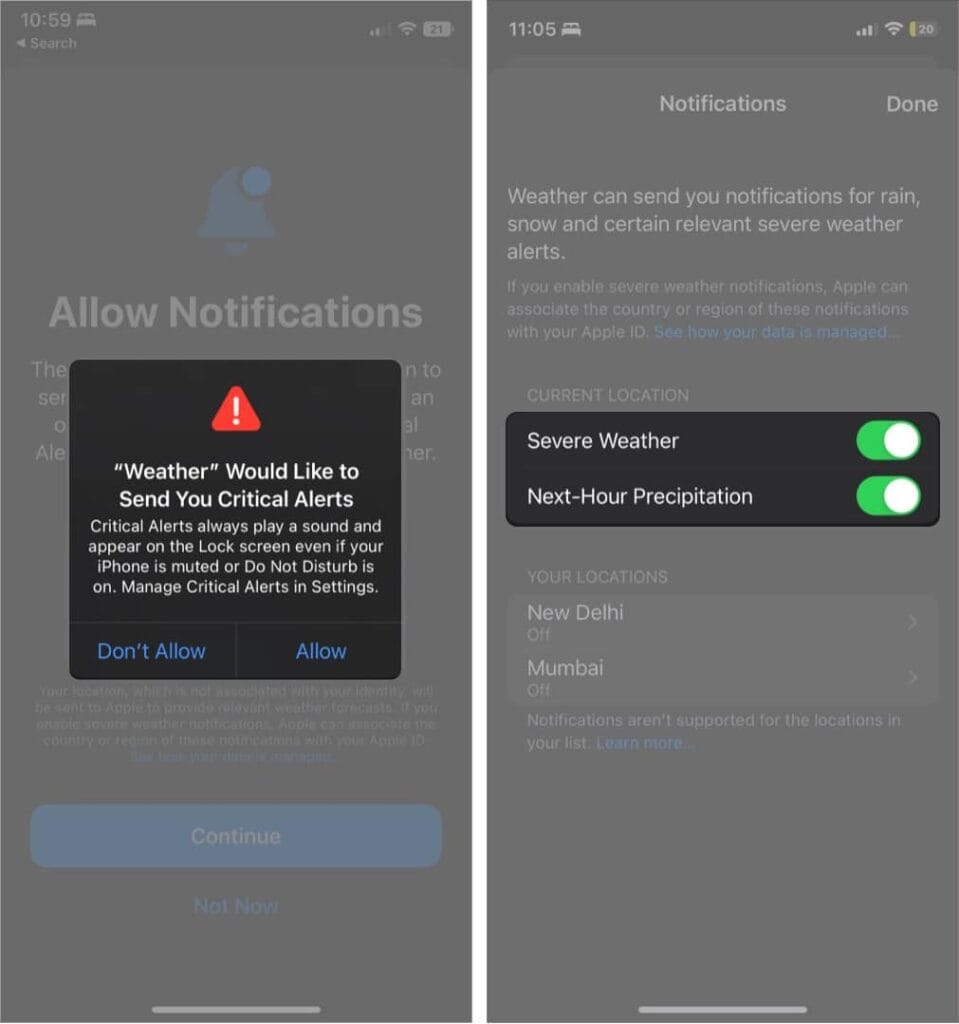
5. When prompted, select Allow twice to give the required access to the app.
6. Now, under the Current Location section, toggle on the switch next to any or both of the following options:
- Severe Weather
- Next-Hour Precipitation
7. Lastly, tap Done to confirm and save the changes.
Also read: Best alarm apps for iPhone and iPad.
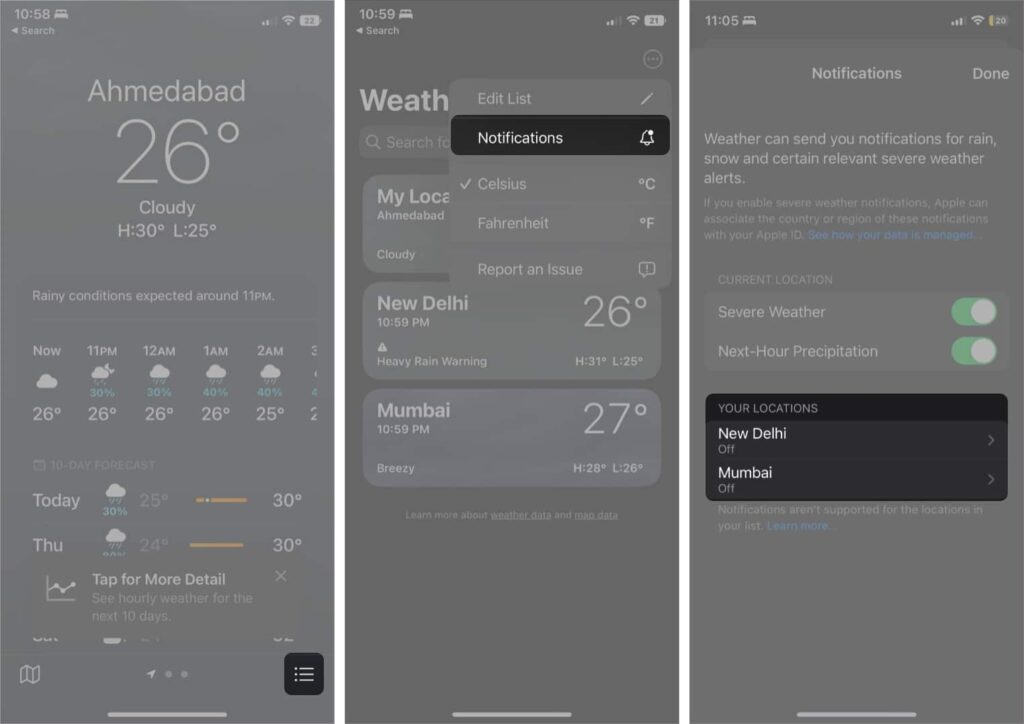
For additional locations
1. Launch the Weather app and tap the bullet list icon at the bottom of the screen.
2. Press the three dots icon and select Notifications from the available options.
3. Under Your Locations section, choose your preferred location and toggle on any or both of the following:
- Severe Weather
- Next-Hour Precipitation
4. Lastly, tap Done to confirm the changes.
You have now successfully enabled weather notifications on your iPhone. From this point on, you will be informed anytime local weather alerts are issued.
Also read: How to change passcode on iPhone or iPad.
How to turn on emergency weather alerts on an iPhone
Staying informed about the weather is critical for your safety, especially during natural disasters or emergencies. Thankfully, your iPhone can receive emergency weather alerts directly from government agencies, providing you with vital information and guidance. Here’s how you can set up to receive these life-saving notifications:
1. Open the Settings app on your device.
2. Head to the Notifications menu. Scroll down and tap on the Weather app.
3. Toggle on the switch next to Critical Alerts and Time-Sensitive Notifications.
4. Go back to the Notifications menu and scroll to the bottom till you see the Alerts section.
5. Scroll down to the Government Alerts section. (This section might be named slightly differently depending on your region.)
6. Tap on Emergency Alerts and make sure the switch next to Emergency Alerts is turned on.
Also read: How to get and use Meta AI on Instagram and WhatsApp.
Stay prepared
No more scrambling to check the forecast before you head out. You’ll be alerted to severe weather and next-hour precipitation so you can stay prepared. Now, you can go forth confidently, knowing you have the information you need to get weather alerts on your iPhone or iPad and make informed decisions about your day.
FAQs
Q. Do weather alerts use cellular data?
Yes, weather alerts typically use a small amount of cellular data to deliver notifications. However, the amount of data used is minimal compared to other activities like streaming video or music.
Q. How often are weather alerts sent to my iPhone or iPad?
The frequency of weather alerts depends on the severity of the weather conditions and the settings you’ve configured in the weather app. Generally, alerts for severe weather events like storms or hurricanes are sent immediately, while alerts for less severe conditions may be sent less frequently.
Q. Do I need to keep the weather app open to receive alerts?
No, you don’t need to keep the weather app open to receive alerts. As long as notifications are enabled for the weather app and your device has an active internet connection, you will receive alerts even when the app is closed.
Was this helpful?
Introducing Bhaskar, your tech-savvy neighbor turned wordsmith extraordinaire. Over the past few years, Bhaskar has become the trusted authority for unraveling the mysteries of iOS, Android, macOS, and Windows. Armed with a B.Tech degree, he has dedicated himself to making technology easy to understand for everyone. His expertise shines through his contributions to well-known publications like Guiding Tech, iGeeksBlog, GeekFrost, and MakeUseOf (MUO). Bhaskar excels in creating straightforward how-to guides and comprehensive articles that make the complex tech landscape accessible to all. When he's not diving into the tech world, you'll find him enjoying music or indulging in sports.