Congratulations on your new device, which opens up a thrilling realm of exploration and productivity. Fear not if you’re a little unsure of where to start. I’m here to offer advice based on my own experience configuring a new MacBook. This article is a comprehensive guide on how to set up a new Mac.
Note: The setup procedures for the iMac, Mac mini, Mac Studios, MacBook Pro, and MacBook Air are the same as those described below.
Prerequisite to set up a Mac (macOS Sonoma)

- Set up Apple ID: Having an Apple ID is necessary for a smooth setup process, so creating one before configuring a new Mac is crucial. An Apple ID is a unique identification number that provides access to a number of Apple services, including iCloud, the App Store, iTunes, and more.
- Activate service and support coverage: This is a crucial step to ensure that your device is protected and eligible for assistance and repairs in case of any issues. You can access Apple’s extensive network of resources by activating your service and support coverage, including technical support, warranty coverage, and repair options.
Therefore, to ensure a seamless experience, I advise you to register your Mac with Apple and check your coverage status. For additional guidance, you can also refer to my article on checking the warranty status of your Apple devices.
Unboxing and Initial Setup
- Unboxing the Mac: The Mac’s unboxing is a thrilling experience that ushers in a new adventure with Apple’s potent computing equipment. I recommend you take care when removing the sleek packaging from the device. However, when you lift the lid, the gleaming display of your potent device will greet you.
- Connecting the Power Adapter: The next thing you should do after opening your Mac’s box and congratulating yourself on your wise purchase is look for the Power Adapter and the cord that goes with it. You must then attach the cable to a wall outlet to give your MacBook the necessary power it requires.
Macs typically come with some battery charge, but the exact percentage is unknown. They have a feature called Find My, like other Apple devices. This feature allows you to locate your device if it gets lost or stolen. It’s important to keep in mind that Find My consumes battery power, even when your device is turned off. - Turning on the Mac: Before proceeding to the main setup process, one important step is to find and press the Touch ID button on the keyboard’s top right corner to turn on your device. Once you’ve pressed the button, patiently wait for a few seconds until the iconic Apple logo appears on the screen. If, for some reason, the Apple logo doesn’t show up, you can try pressing the button again.
Select Language
Apple provides a wide selection of 59 languages for users to choose from. Additionally, they offer various regional variants like British, Australian, Canadian, and Indian English, which incorporate local spellings, punctuation, and other linguistic adaptations.
You must choose the language carefully as it will be the default language of the macOS and will affect the language used in menus, dialogue boxes, and pre-installed applications. When you have decided on a language, click the right arrow to proceed. Additionally, you can change the same once your Mac has been configured.
Set your country or region
Setting your country or region on a new MacBook is more than just a technicality; it’s an essential step that opens up a plethora of options beyond language preferences and time zones on your device.
Accessibility options

Individuals with various abilities can easily use their MacBook thanks to the wide variety of features Apple includes in its macOS. For instance, you can choose Not Now if you’re impatient to use your computer right away and would like to skip this procedure temporarily.
However, if you wish to learn more, these features include the VoiceOver screen reader, which provides users with visual impairments with auditory descriptions; motor-impaired users can customize their keyboard and pointer settings; and visually impaired users can customize their display and color settings.
Connect to a Wi-Fi network
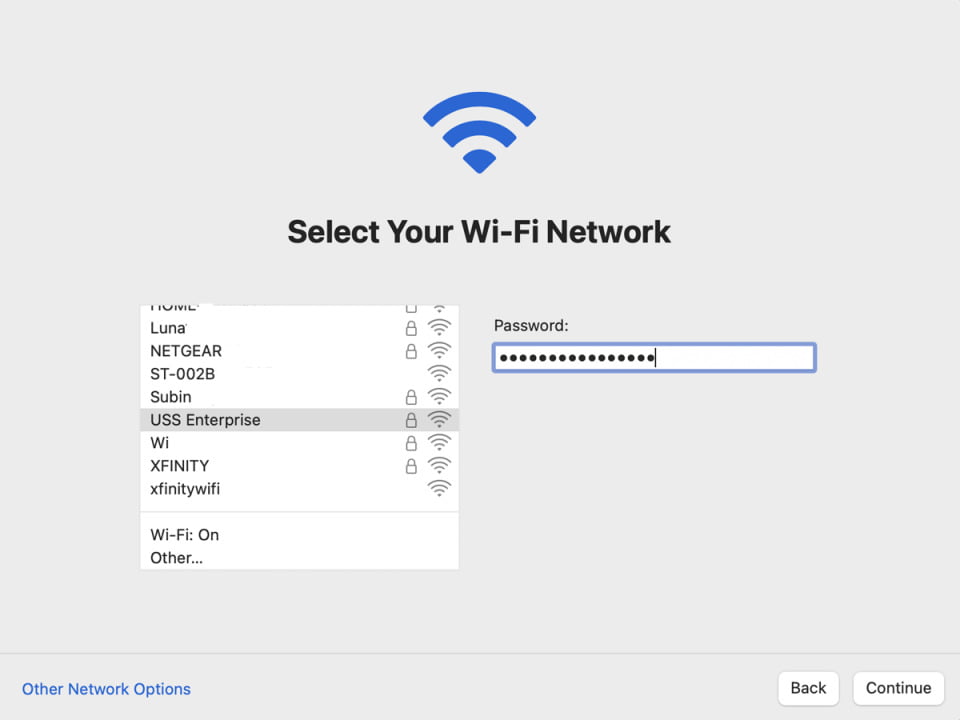
Connecting to a Wi-Fi network is an important step in setting up a new MacBook because it seamlessly connects your device to the internet and provides access to a wealth of information, entertainment, and connectivity. Simply choose your Wi-Fi name from the list → Enter the password → Once the connection is established, click Continue.
Data and Privacy screen
Protecting your personal information has become more crucial than ever, and Apple provides robust tools to safeguard your data. This screen allows you to customize your privacy settings, granting you control over how your information is shared with Apple and third-party apps. By selecting Learn More, you can read the entire policy or accept it by choosing Continue.
Transfer information

Migrate Assistant can be your reliable companion if you want to import data and applications from your old device to a new one. It provides a user-friendly interface and effortless synchronization features, making the process seamless and hassle-free.
Sign in with your Apple ID
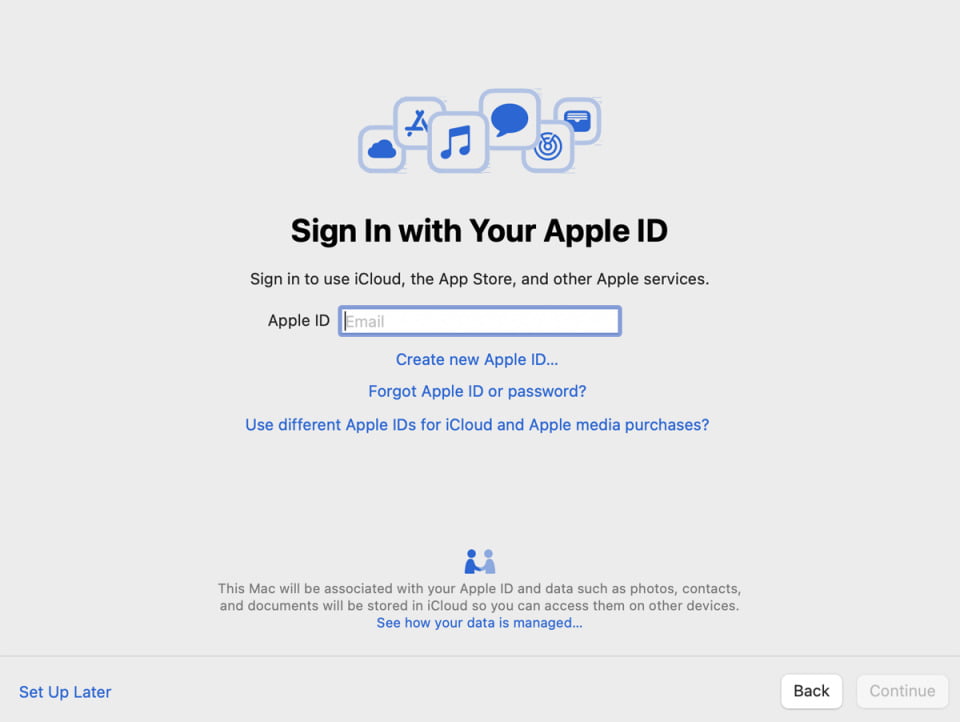
Signing in with your Apple ID is a crucial step in the setup process of your new Mac. With a few simple clicks, this feature grants you access to a vast array of apps, services, and iCloud storage, seamlessly synchronized across all your Apple devices. If you don’t already have an Apple ID, you can create one by selecting Create New Apple ID. Alternatively, if you prefer to set it up later, you can choose Set Up Later and get going with the process of Mac setup.
However, if you wish to initiate the Sign-in process using your Apple ID, begin by entering your Apple ID and passcode. If you have enabled Two-factor authentication for your ID and are currently logged in on another device, you will be prompted to enter a 6-digit PIN. After entering the PIN, you will receive the Terms and Conditions, which you should review and accept to proceed with the setup.
Create a Computer Account
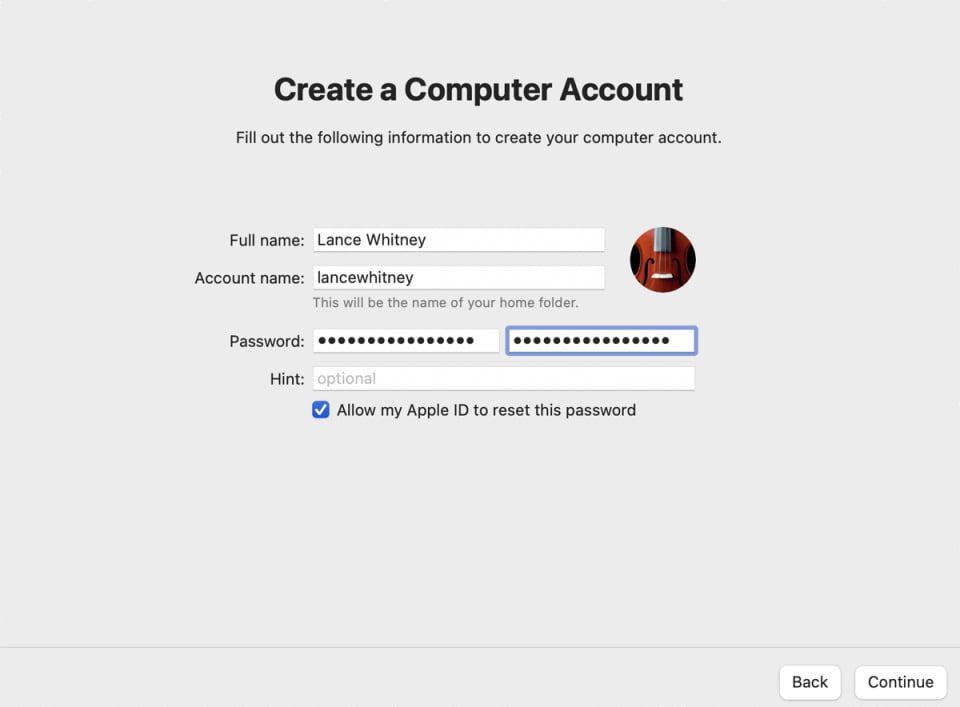
Creating a computer account is another important step while setting up a new Mac. This account will serve as your personal profile on the MacBook, allowing you to access its features and customize your settings. To create a new account, you must provide information such as your full name, account name, password, password hint, and profile photo. Once you have entered these details, click the Continue button to advance further in the setup procedure.
Note: You should check the box next to Allow my Apple ID to reset this password.
Set up Find My
Find My is a useful tool that lets you find your device if it goes missing or gets lost. You can enable Find My on your new Mac during setup by clicking the Continue button. You can only enable it during setup, but you can turn it off later if you don’t want to use it.
Enable or disable Location Services

Enabling Location Services on your Mac grants apps access to your device’s location, serving various purposes such as locating nearby businesses and attractions, providing directions, weather forecasts, and more. To activate this feature, check the box next to Enable Location Services on this Mac and proceed by clicking Continue.
Share Analytics
Configuring the Share Analytics settings is one of the steps involved in setting up a new MacBook. With the help of the Share Analytics feature, Apple and developers can gather anonymous information about how you use your device and applications in order to improve their goods and services.
However, if you are concerned about privacy and would rather not share this information, you have the choice to uncheck both boxes during the setup process. Doing this ensures that your user information is kept private and isn’t given to Apple or developers.
Turn on Screen Time

Screen Time is a feature that allows you to monitor and regulate the amount of time you spend on your MacBook, ensuring a healthy balance between work and leisure. You can set app limits within the Screen Time settings, schedule downtime, and establish content restrictions with this feature while you set up your new Mac.
By effectively managing your screen time, you can optimize productivity, prioritize important tasks, and maintain a healthy digital lifestyle while using your new MacBook. The impact of utilizing Screen Time might surprise. 🫢
Enable Siri and “Hey Siri”

When setting up your Mac, you have the opportunity to enable the Apple-developed smart assistant Siri. It can perform various tasks without the need for physical interaction. To activate Siri during the setup process, check the Enable Ask Siri box and click the Continue button.
Additionally, you will be prompted to configure the Hey Siri feature, which allows for hands-free operation. You can proceed by clicking Continue and following the on-screen instructions to speak the displayed prompts. Alternatively, you also have the option to postpone the setup of Hey Siri for a later time.
Turn on FileVault Disk Encryption
FileVault is a built-in feature of macOS that encrypts the data on your disk and renders it unreadable without the right encryption key. By enabling FileVault, you add another line of defense against unauthorized access to your files, particularly if your MacBook is stolen or lost.
Your sensitive information is protected by this encryption process, which also prevents unauthorized access to your data. Simply check the two boxes that are located beneath FileVault Disk Encryption to activate it and click Continue to head to the next step.
Set up Touch ID

Setting up Touch ID on your Mac offers numerous conveniences, such as effortless unlocking without the hassle of entering passwords. Moreover, it facilitates tasks like authorizing purchases, making payments with Apple Pay, and signing into websites. If you prefer to delay Touch ID setup, you can choose the Set Up Touch ID Later option.
Alternatively, to begin the setup process, simply press Continue and place your finger on the Touch ID button at your keyboard’s top right corner. Follow the on-screen instructions provided to complete the setup.
Set up Apple Pay
Setting up Apple Pay on your Mac offers a secure and convenient method for online and in-app payments. Thanks to the integration of Touch ID, you can now make purchases without repeatedly entering your credit card information. You have the freedom to use Apple Pay wherever you shop because many international retailers widely accept it.
By selecting Continue and following the on-screen instructions, you can move forward immediately during the setup process. Alternatively, if you’d like, you can select Set Up Later to set up Apple Pay at a later date.
Choose your look

One of the first choices you’ll have to make when you decide to set up your new Mac is whether to use the Dark Mode or Light Mode interface. The operating system on your device will look and feel exactly how you choose it to.
Dark Mode presents a sleek and sophisticated aesthetic. Reducing eye strain and improved focus, especially in low-light settings, with a dark background and light-colored text and icons.
On the other hand, Light Mode presents a more conventional and bright appearance with a white background and dark text and icons. It offers a clear and comfortable feeling that is perfect for well-lit environments. The choice ultimately comes down to personal taste and how you plan to use your MacBook.
If you’re unsure which one to choose, you can select Auto, and this will automatically switch the modes depending on the sunrise and sunset in your area. Once you’ve selected a mode for your Mac, you can press Continue.
Update your Mac
Congratulations on setting up your new Mac successfully! However, at least on my watch, the setup process doesn’t end there. Since I personally prefer to take a few extra steps. Update your Mac to the most recent version of macOS as the first step in this direction so that you can take advantage of the most recent features, improved performance, security features, and compatibility with hardware and software.
Configuring Peripherals and Accessories
Let’s look at how to connect accessories and peripherals to your new Mac so that you don’t run into any problems while using it as your daily driver:
- Connecting and Configuring Printers: Printers are a useful tool for both personal and professional use because they enable us to convert digital documents into physical copies. You can read our article if you’re having trouble connecting to and configuring printers.
- Pairing Bluetooth Devices: Bluetooth technology enables wireless connectivity between your MacBook and various peripherals like keyboards, mice, AirPods, and speakers, improving your overall computing experience.
- Connecting External Monitors: Expanding your Mac’s real estate allows you to multitask while working on several programs and documents at once. You can add an external monitor to your Mac using various techniques, such as the clamshell mode of your Mac or the Sidecar feature if you have an iPad.
Let’s get started!
Apple has thoughtfully crafted the Mac device as it embodies elegance and functionality. Everything about the product is appealing, from the sleek design to the seamless blending of hardware and software. I believe the steps above should have helped you to set up your new Mac.
The lightweight design, battery life, and power it offers me to run demanding programming apps personally attracted me to it. Moreover, you may also want to check how to factory reset a Mac if you’ve purchased a refurbished Mac. Please share in the comments what convinced you to buy your MacBook.
FAQs
There can be numerous potential causes behind the issue, like your Mac being excessively hot, your charging adaptor not functioning, etc. However, you can refer to our comprehensive article that provides easy solutions for resolving the problem of a MacBook not charging when plugged in.
To set up iCloud Drive on your Mac, you need to head to the Apple logo → Choose System Settings → Click on your name → Navigate to iCloud → Select iCloud Drive → Toggle on Sync this Mac → Click Done.
When it comes to installing new apps on your Mac, there are several methods you can use. However, I advise you to use the Mac App Store for downloading apps. Alternatively, you can download or install apps from third-party websites through USB hard drives
Starting a Mac in recovery mode is easy all you need to do is follow the instructions provided in our article.
Was this helpful?
Nutan is a BCA graduate with a keen interest in the world of consumer technology. A fan of both the Apple and Google ecosystems, he enjoys exploring the latest gadgets and how they can enhance our daily lives. Nutan specializes in crafting clear and informative how-to guides and comprehensive buying advice. His insightful reviews offer an in-depth look at the pros and cons of the newest tech products, helping readers make the best decisions for their needs.


