Have you ever watched a video and wished you could keep just the audio? Whether it’s an inspiring speech, a captivating soundtrack, or a hilarious joke, being able to extract audio from video on your iPhone, iPad, or Mac can be incredibly useful. As someone who’s done this numerous times to create ringtones, store favorite quotes, and more, I can assure you that the process is straightforward. Let’s dive into the best ways to extract audio from video on your Apple devices.
5 Best methods to extract audio from video on iPhone and iPad
Extracting audio from video on your iPhone or iPad is not just a possibility, but a gateway to a world of creative freedom. Whether you want to create a custom ringtone, isolate an important lecture, or enjoy a soundtrack independently, these versatile methods will empower you to achieve your goal. Each technique, whether it’s using built-in Apple apps or third-party solutions, is designed for ease of use, putting the power in your hands.
Method 1: Using the iMovie app
iMovie isn’t just for video editing; it’s also a great tool to extract audio from video on iPhone. You can access the sound file separately by detaching the audio track from your video. This method is particularly useful because iMovie is a trusted Apple application, ensuring seamless integration and high-quality output. Here’s how:
1. Open iMovie on your iPhone or iPad.
2. Tap on Create Project and select Movie.
3. Import the video from which you want to extract the audio.
4. Tap the video timeline, then tap Detach Audio.
5. You’ll see the audio track separated from the video.
6. Tap the audio track and choose Share.
7. Select Save to Files or any other location.
Also read: How to turn videos into GIFs on your iPhone.
Method 2: With the help of Shortcuts
Shortcuts is a powerful automation tool that can streamline complex tasks into simple, one-tap actions. For example, setting up a shortcut to extract audio from video can save time and avoid repetitive steps.
1. Open Shortcuts on your device.
2. Create a new shortcut by tapping the + icon.
3. Add the Get File action to select your video.
4. Add the Encode Media action and choose Audio Only.
5. Finally, add the Save File action to save the extracted audio.
6. Run the shortcut, and voila!
Method 3: Using Media Converter – Video to MP3 app
Media Converter – Video to MP3 is a straightforward third-party app that specializes in converting video files to audio. This method supports various output settings, allowing you to choose the best format and quality for your needs.
1. Download and open Media Converter – Video to MP3 from the App Store.
2. Import your video by tapping the + button.
3. Select Convert to MP3.
4. Choose the output settings and tap Start Conversion.
5. Save the MP3 file to your desired location.
Method 4: With the help of the InShot app
InShot is a versatile app known for its user-friendly interface and comprehensive editing tools. Its audio extraction feature allows you to easily save audio from any video file.
1. Install and open InShot from the App Store.
2. Import your video.
3. Tap on Music and then Extract Audio.
4. Save the audio file.
Also read: How to enable YouTube Picture-in-Picture mode on iPhone and iPad.
Method 5: Using Restream Audio Extractor online free converter
For those who prefer not to download additional apps, Restream Audio Extractor offers a convenient online solution. This method allows you to extract audio from video files directly through your web browser.
1. Visit Restream Audio Extractor on your browser.
2. Upload your video file.
3. Select the audio format you want.
4. Download the extracted audio.
5 Effective ways to extract audio from video on Mac
Your Mac provides powerful tools for audio extraction, combining the simplicity of built-in apps with the robustness of third-party solutions. These methods ensure that you can easily extract audio from video files, whether you prefer QuickTime’s straightforward interface, iMovie’s editing capabilities, or the quick access of Finder’s right-click options.
Method 1: Using the QuickTime Player
QuickTime Player is an integral part of macOS. It offers a simple and efficient way to export audio from video files. During export, you can quickly isolate the audio track by selecting the Audio Only option.
1. Open your video in QuickTime Player.
2. Go to File, select Export As, and choose Audio Only.
3. Choose your save location and file format.
4. Click Save.
Method 2: With the help of the iMovie app
iMovie on Mac offers more advanced editing capabilities, including the ability to detach audio from video clips. This method is particularly useful for those who need to edit the audio before saving it, providing a sense of control and security over the final output.
1. Open iMovie on your Mac.
2. Import your video into a new project.
3. Right-click on the video timeline and select Detach Audio.
4. Export the audio by going to File, choose Share, select File, and click Audio Only.
Also read: Best video player apps for iPhone and iPad.
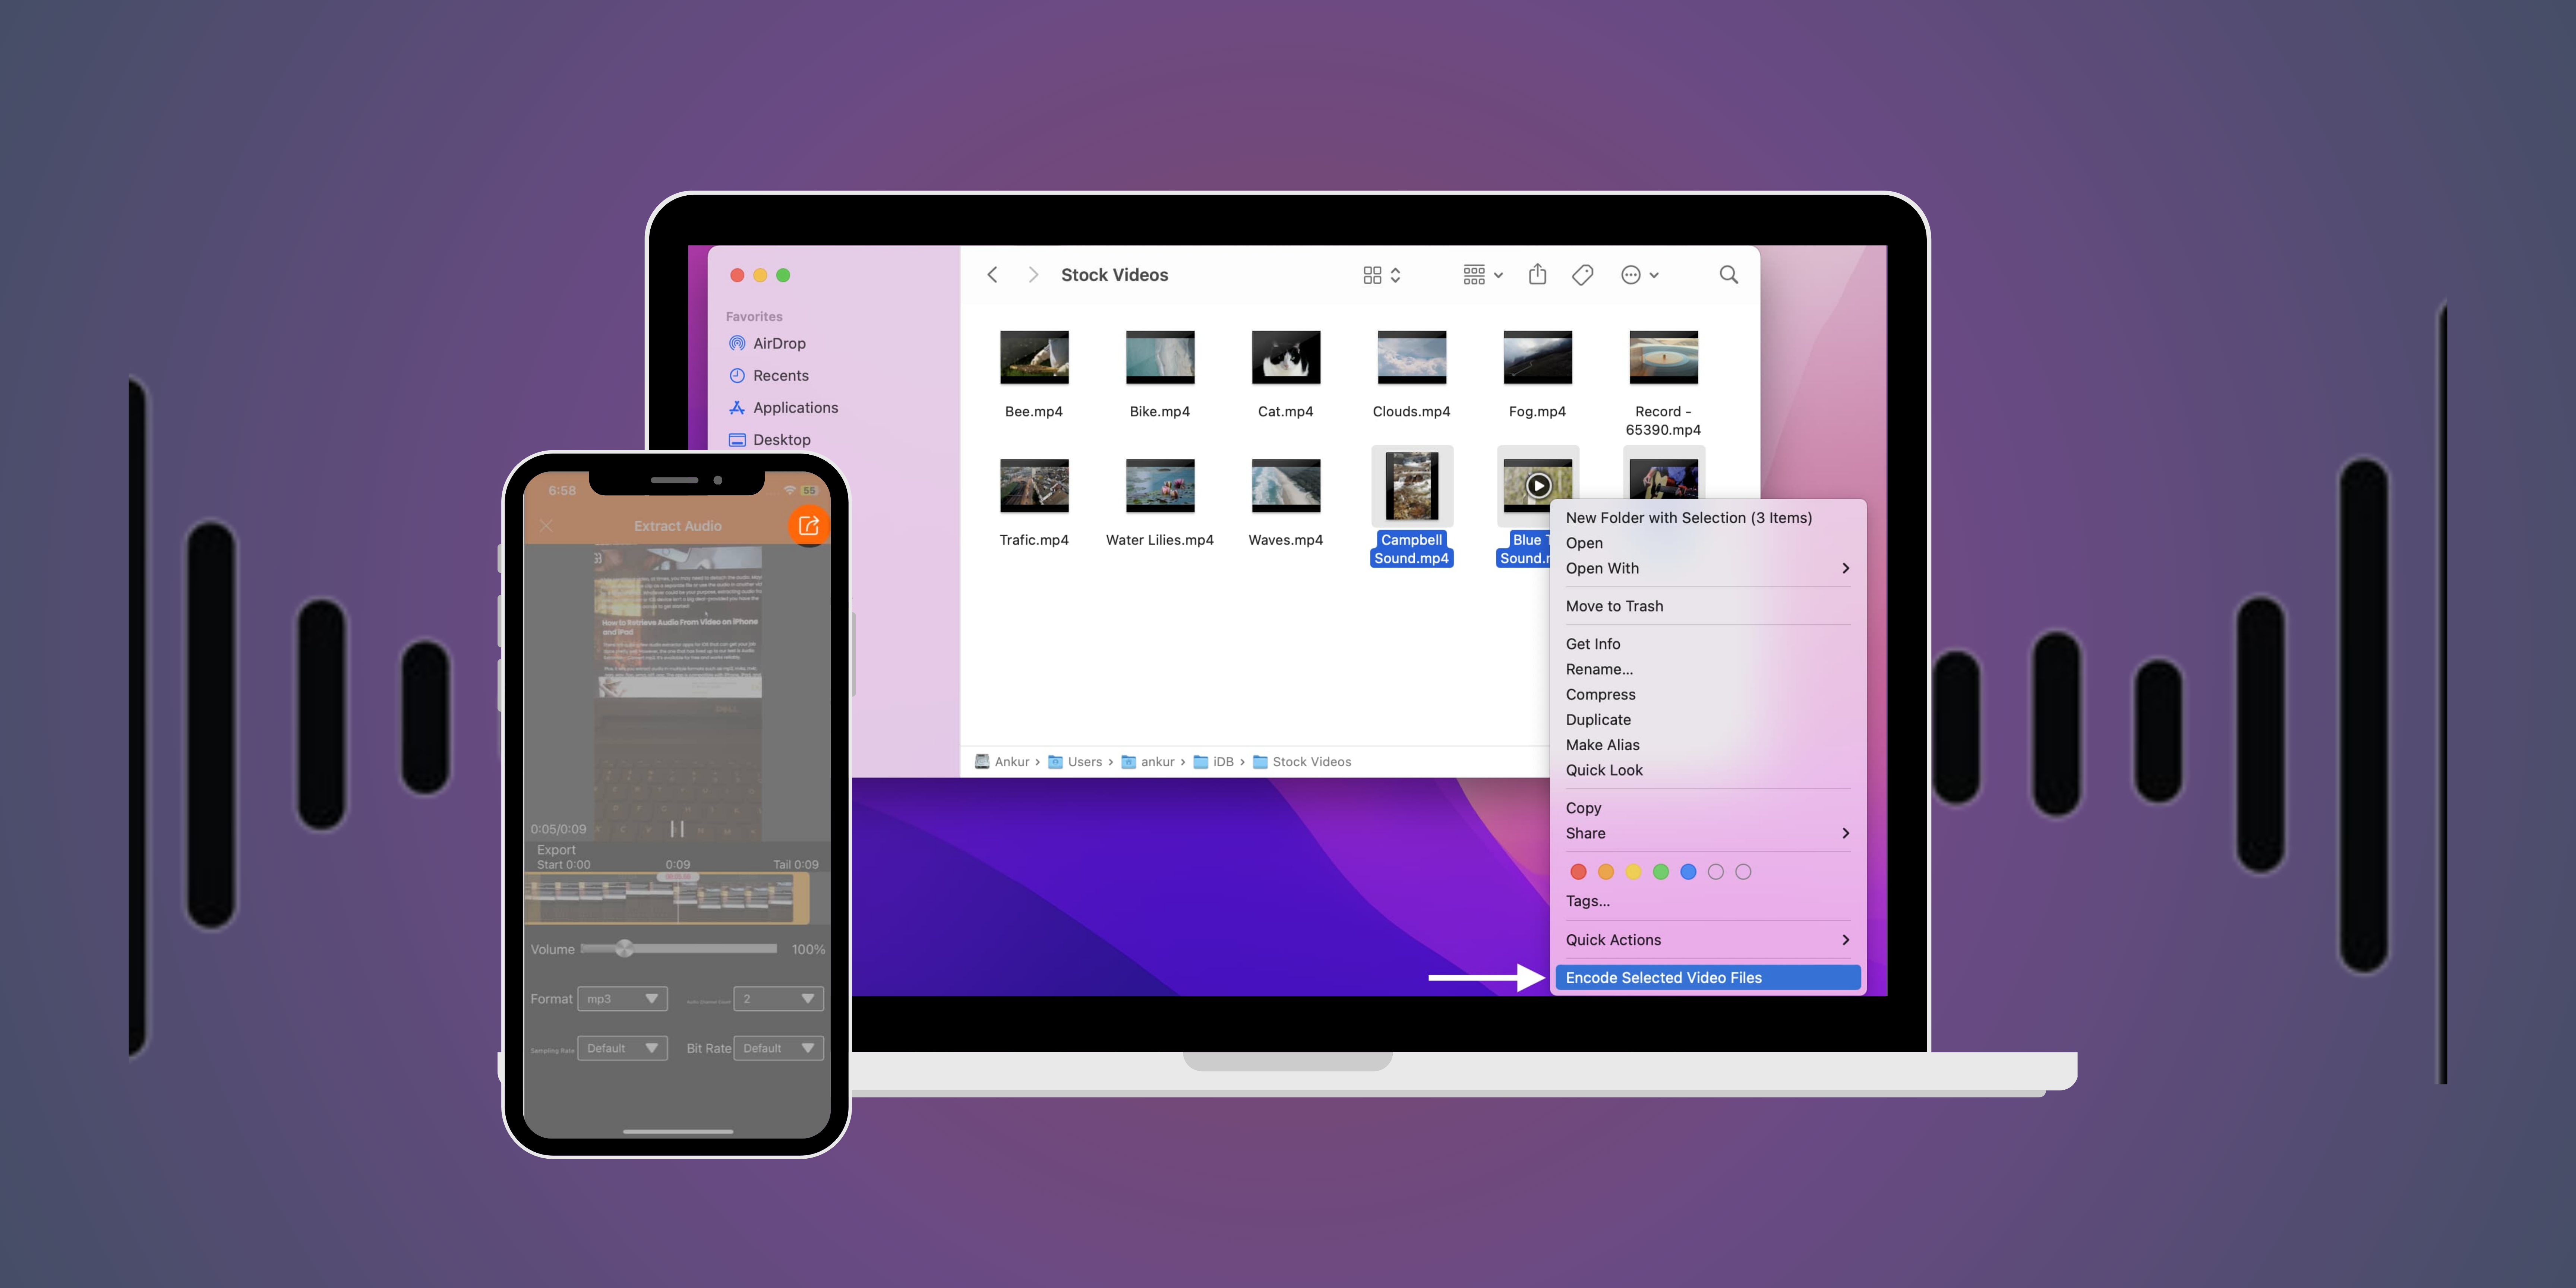
Method 3: Using Finder’s Right-click or Control-click
The right-click or control-click method in Finder is a quick and straightforward way to extract audio from video files. By encoding the selected video files as Audio Only, you can easily generate an audio file without needing additional software.
1. Locate your video file in Finder.
2. Right-click (or Control-click) the file.
3. Select Encode Selected Video Files.
4. In the options, choose Audio Only.
5. Click Continue and save the file.
Method 4: With the help of online audio extractors
Online audio extractors are a breath of fresh air for those who prefer not to download additional software. They offer a convenient and hassle-free way to extract audio from video files directly through your web browser, providing a sense of relief and ease.
1. Visit a trusted online audio extractor website like Audio Extractor.
2. Upload your video file.
3. Choose the audio format you want.
4. Download the extracted audio.
Also read: How to set any song as a ringtone on an iPhone.
Method 5: Using the Audacity apps
Audacity is a potent, open-source audio editing program that is extensively used for recording, editing, and mastering audio files. Many capabilities are available, such as compatibility for multiple audio formats, multiple tracks for editing, and a variety of effects. Audacity is available for different operating systems, including macOS, making it a versatile tool for audio enthusiasts and professionals alike. To extract audio from a video using Audacity on a Mac, follow these steps:
1. Get Audacity from the official website and install it.
2. Go to Audacity, select Preferences, and choose Libraries. Click Download next to FFmpeg Library and follow the instructions.
3. Launch the application from your Applications folder.
4. Select File, choose Import, select Audio, and choose your video file. Audacity will extract and display the audio in the timeline.
5. Use Audacity’s tools and effects to modify the audio as desired.
6. Head to File, choose Export, and select your preferred format (e.g., WAV, MP3).
7. Choose a destination and click Save.
Groove with Music!
Extracting audio from video on iPhone, iPad, and Mac can be a breeze with the right tools. Whether you prefer using built-in apps like iMovie and QuickTime or third-party solutions, you’ve got plenty of options. Each method offers unique advantages, ensuring you can find the perfect fit for your needs. Now, go ahead and extract those sweet sounds from your videos!
FAQs
Q. Can I extract audio from any video format on my iPhone or iPad?
Yes, most of the mentioned apps support various video formats. However, it’s always good to check the app specifications for compatibility.
Q. Is there a loss in audio quality when extracting from video?
The audio quality generally remains the same, but it can depend on the app or method used. Always use reputable apps for the best quality.
Q. Are these methods free to use?
Most of the methods mentioned offer free options. Some apps might have in-app purchases for advanced features.
Was this helpful?
Introducing Bhaskar, your tech-savvy neighbor turned wordsmith extraordinaire. Over the past few years, Bhaskar has become the trusted authority for unraveling the mysteries of iOS, Android, macOS, and Windows. Armed with a B.Tech degree, he has dedicated himself to making technology easy to understand for everyone. His expertise shines through his contributions to well-known publications like Guiding Tech, iGeeksBlog, GeekFrost, and MakeUseOf (MUO). Bhaskar excels in creating straightforward how-to guides and comprehensive articles that make the complex tech landscape accessible to all. When he's not diving into the tech world, you'll find him enjoying music or indulging in sports.