
Is your Mac’s trackpad or external mouse no longer functioning? Fear not! Macs come equipped with a useful accessibility feature that allows you to navigate the mouse cursor in any direction and execute clicks using the keyboard. In this tutorial, I’ll illustrate how to use your keyboard as a mouse on your Mac.
Macs have a very helpful accessibility feature that lets you use just the keyboard to move the mouse cursor in any direction and simulate clicks. The trackpad or USB mouse is less effective when pixel accuracy is needed, which can easily be obtained while using your keyboard as a mouse. So, without any further ado, let’s check how we can do so.
How to activate Mouse keys on Mac
Learn how to use your keyboard to enable Mouse Keys on your MacBook to control the Mouse Pointer.
- Click on the Apple logo in the top-left corner of your screen and navigate to System Settings.

- Go to Accessibility and select Pointer Control.

- Toggle on the Mouse Keys.

- Customize Mouse Keys for Your Preferences
Tailor the Mouse Keys settings to suit your needs
Now, you have the ability to control the Mouse Pointer on a MacBook using your keyboard. Let’s explore how to customize it to meet your preferences. To do this, click the (i) button on the screen and make the adjustments as mentioned below to tailor it to your requirements.
- Option Key: This functionality lets you quickly enable the shortcut for activating Mouse Keys. Activate it by turning on the “Press the Option key five times to toggle Mouse Keys” option.
- Ignore the built-in Trackpad when Mouse Keys is on: Opting for this feature will deactivate the trackpad to prevent any inadvertent cursor movements caused by tapping on the trackpad.
- Initial Delay: Adjust the system’s response time to a mouse key input with this slider. A longer latency ensures that the cursor remains stationary if a key is accidentally touched.
- Maximum Speed: Customize the pointer’s speed using this slider when a key is pressed and held.
How to move the mouse with the keyboard shortcuts on Mac
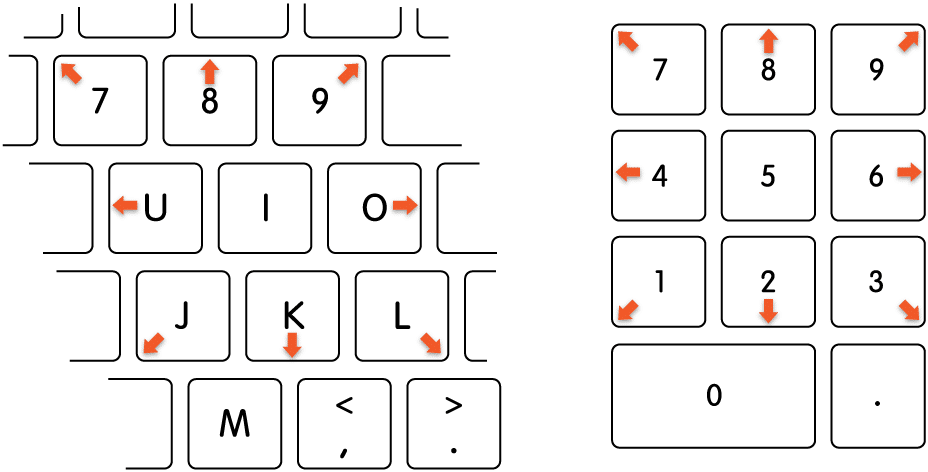
Below are the numeric and non-numeric keys that can help you move your cursor on Mac.
- Move Up: Numeric keyboard (8), Non-numeric keyboard (8).
- Move Down: Numeric keyboard (2), Non-numeric keyboard (K).
- Move Left: Numeric keyboard (4), Non-numeric keyboard (U).
- Move Right: Numeric keyboard (6), Non-numeric keyboard (O).
- Diagonal Movements: Various combinations for different directions.
- Mouse Button Actions: Click, Hold, Release.
Now that you’ve learned how to move the cursor with keyboard shortcuts, you can do your tasks without a mouse. To control-click on your Mac, just press the Control + M keys on your keyboard. You can also drag an item by pressing M and moving the cursor with keys. To drop the item, put the cursor where you want and press the Period key.
More keyboard shortcuts to navigate Mac without a mouse

Use these shortcuts to do different things on your computer:
- Control + F7 or Fn + Control + F7: Switch between all the things on your screen, like text boxes and lists.
- Tab: Move to the next thing.
- Shift + Tab: Go back to the thing before.
- Control + Tab: Jump to the next thing when selecting a text box.
- Control + Shift + Tab: Go back to the set of things before.
- Arrow keys: Move to the next item in a menu or list. For sliders, use the Up Arrow to increase values and the Down Arrow to decrease values.
- Control + Arrow keys: Move to the control next to a text box.
- Space bar: Choose the thing that’s selected.
- Return or Enter: Do the default action.
- Esc: Close a menu by selecting nothing or clicking “Cancel.”
- Control + Shift + F6: Focus on the thing before.
- Control + F8 or Fn + Control + F8: Go to the status menu in the menu bar.
- Command + Grave accent (`): Open the next window in the main.
- Shift + Command + Grave accent (`): Activate the app window that was open before.
- Option + Command + Grave accent (`): Pay attention to the window drawer.
Use the keyboard as a mouse on a Mac
You can use your Mac without a mouse by using keyboard shortcuts. When you need to be really accurate, like pointing to tiny details on the screen, the trackpad or USB mouse may not be as helpful. Instead, you can easily control the mouse with the keyboard. What do you think about using the keyboard as a mouse on the Mac?
FAQs
You may adjust the double-click speed or update your macOS. If none of the solutions work, see our article regarding the Mac’s broken trackpad.
While the mouse pointer capability is enabled, some keys may not work. If this occurs, you may disable the mouse pointer by pressing the option key five times on your keyboard.
Was this helpful?

Nutan is a BCA graduate with a keen interest in the world of consumer technology. A fan of both the Apple and Google ecosystems, he enjoys exploring the latest gadgets and how they can enhance our daily lives. Nutan specializes in crafting clear and informative how-to guides and comprehensive buying advice. His insightful reviews offer an in-depth look at the pros and cons of the newest tech products, helping readers make the best decisions for their needs.

Chhavi Tomar is a dynamic person who works as an Editor for The Writing Paradigm. She studied B.Sc. Physics and is currently doing a B.Ed. She has more than three years of experience in editing, gained through freelance projects. Chhavi is skilled in technology editing and is actively improving her abilities in this field. Her dedication to accuracy and natural talent for technology make her valuable in the changing world of digital content.