Are you tired of Windows 11 sneaking in those automatic updates right when you’re in the middle of something important? Well, you’re not alone. While updates can be crucial for security and performance, sometimes you just need to take control of when and how they happen. This guide will show you exactly how to turn off automatic updates on Windows 11 so you can decide when your system gets its updates.
Method 1: Using Windows Settings
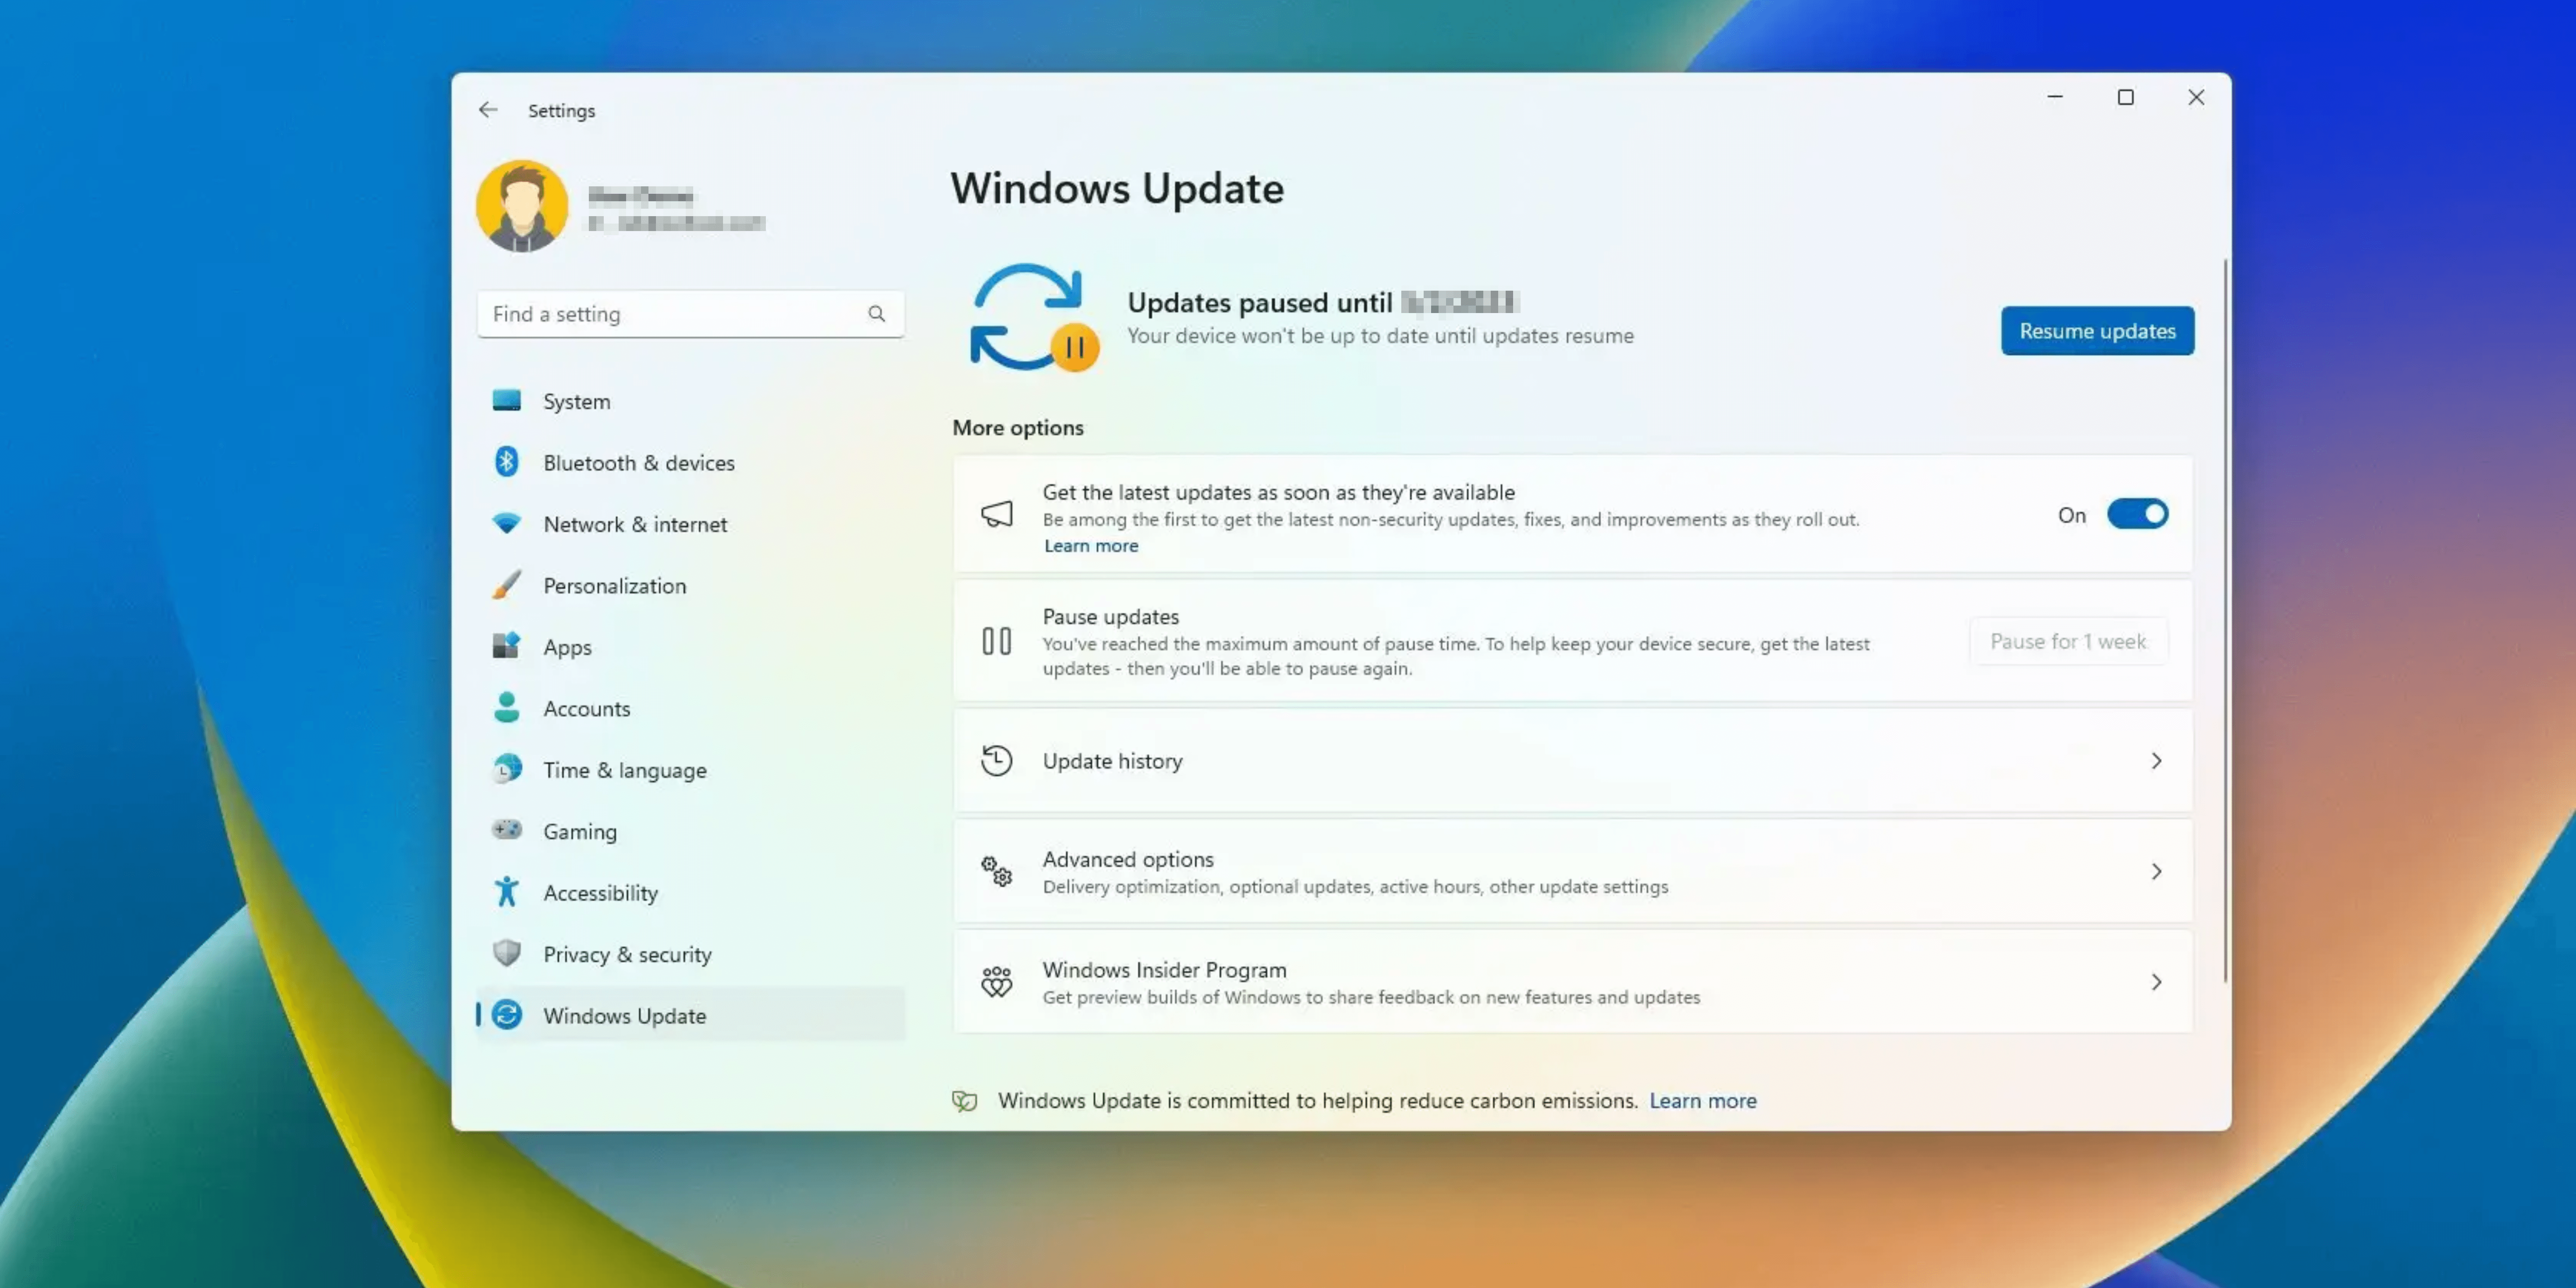
The first and simplest method to turn off automatic updates on Windows 11 is through the Windows Settings. This method is great for those who need a break from constant updates or want to avoid any potential disruptions during a busy period.
It’s straightforward and doesn’t require any advanced knowledge, making it accessible for all users. However, remember that this is a temporary fix, and you’ll need to revisit the settings to keep updates paused.
1. Click on the Start Menu and select Settings (or press Win + I).
2. In the left-hand menu, find and click on Windows Update.
3. Under the More options section, click on Pause updates. You can choose to pause updates for a period of up to 35 days.
While this doesn’t completely turn off updates, it does give you a break for a while.
Note: This method will temporarily stop Windows from automatically downloading and installing updates for up to 35 days
Method 2: Using the Group Policy Editor (for Windows 11 Pro, Enterprise, and Education)
For users with Windows 11 Pro, Enterprise, or Education editions, the Group Policy Editor offers a powerful way to disable automatic updates. By configuring the Group Policy, you can effectively prevent Windows from initiating automatic updates, giving you full control over when and how updates are installed.
This method is particularly useful in professional environments where stability and predictability are essential. It ensures that updates won’t interfere with critical tasks or system performance. Here’s how you can use it:
1. Press Win + R, type the below-mentioned, and press Enter.
gpedit.msc
2. Head to Computer Configuration and select Administrative Templates.
3. Locate Windows Components and choose Windows Update.
4. Find and double-click on Configure Automatic Updates. Set it to Disabled, click Apply, and then OK.
This method effectively stops automatic updates from downloading and installing without your consent.
Also read: to fix overheating on a Windows laptop.
Method 3: Using Network Settings
Setting your network connection to metered is another effective method to turn off automatic updates on Windows 11. This approach tricks Windows into thinking you are on a limited data plan, preventing automatic updates from being downloaded.
This method is particularly useful if you’re on a limited or slow internet connection, as it helps save bandwidth and avoids unwanted data usage. It’s a simple yet effective way to control updates without diving into more technical settings.
1. Navigate to the Start Menu and select Settings.
2. Click on Network & Internet.
3. Select your network connection (Wi-Fi or Ethernet) and click on Properties.
4. Toggle the switch to set your connection as a Metered connection.
This method is particularly useful if you’re on a limited data plan.
Method 4: Using Registry Editor
For those comfortable with diving into the registry, this method allows you to turn off automatic updates on Windows 11 by editing the registry. Modifying the registry can stop the Windows Update service from automatically downloading and installing updates.
This method provides a more permanent solution and gives you deep control over update settings. However, it’s crucial to be careful when making changes in the registry, as incorrect modifications can cause system issues.
1. Press Win + R, type the following, and press Enter.
regedit
2. Paste the following in the status bar and press Enter.
HKEY_LOCAL_MACHINE\SOFTWARE\Policies\Microsoft\Windows\WindowsUpdate\AU.
3. If the AU key doesn’t exist, create it. Then, create or modify a DWORD (32-bit) Value named NoAutoUpdate and set its value to 1.
This method ensures that Windows Update won’t automatically download and install updates.
Also read: Best unblocked browsers to open blocked sites.
Method 5: Using the Services Console
Another technical approach is to disable the Windows Update service via the Services Console. By stopping and disabling this service, you can ensure that Windows Update won’t automatically run, effectively halting any automatic updates.
Furthermore, it is powerful and provides a robust solution, as it stops the update process at its root. However, it’s important to periodically check for updates manually to ensure your system stays secure.
1. Press Win + R, type the following in the box, and press Enter.
services.msc
2. Scroll down and find the Windows Update service.
3. Right-click on it, select Properties, and set the Startup type to Disabled. Click Stop to stop the service immediately.
This will prevent the service from starting and checking for updates.
Also read: How to remove recycle bin from desktop.
Method 6: Setting a metered connection
This method is another straightforward way to manage updates, such as setting your internet connection to metered. Similar to using network settings, this approach informs Windows that your network is limited, thus preventing automatic updates from downloading.
It’s a quick and easy way to control updates without diving into more technical settings. This method is particularly useful for users who frequently switch between different networks and want to manage data usage efficiently.
1. Open the Settings app.
2. Click on Network & Internet, choose the network you are connected to, and toggle Set as metered connection.
This will prevent Windows from using that connection for automatic updates.
Method 7: Using a Third-Party Tool
If you’re looking for a hassle-free solution to turn off automatic updates on Windows 11, using a third-party tool might be the way to go. These tools are designed to provide a simple interface for managing Windows updates, eliminating the need to dive into settings or the registry.
By using a third-party tool, you can easily disable automatic updates with just a few clicks, and many of these tools offer additional features to customize your update experience. It’s crucial to download these tools from reputable sources to avoid any potential security risks. Here are some of the best tools available:
1. StopUpdates10: A popular tool that makes it easy to disable and enable Windows updates with a single click. It also provides options to block forced updates.
2. Windows Update Blocker: This tool offers a straightforward interface to block Windows updates and related services, ensuring that no updates are installed without your consent.
3. Wu10Man: Wu10Man (Windows 10 Update Manager) allows users to disable the Windows Update service and block various update-related URLs.
4. O&O ShutUp10: While primarily a privacy tool, O&O ShutUp10 includes features to manage Windows updates, giving you control over when and how updates are installed.
5. Winaero Tweaker: A comprehensive tool that offers various customization options for Windows, including the ability to disable automatic updates.
These tools provide a user-friendly interface to manage updates without diving into settings or the registry.
Automatic updates stopped!
Taking control of your update schedule can save you a lot of hassle, and now you know how to turn off automatic updates on Windows 11 using various methods. Whether you prefer using built-in settings, tweaking the registry, or employing third-party tools, you have the power to decide when and how your system updates.
FAQs
Q. Will turning off automatic updates affect my system’s security?
Yes, it can. Regular updates often include important security patches. If you choose to turn off automatic updates, make sure to manually check for updates regularly to keep your system secure.
Q. Can I re-enable automatic updates after turning them off?
Absolutely. You can follow the same methods above and adjust the settings to enable automatic updates again.
Q. Are there any risks to modifying the registry or using the Group Policy Editor?
Yes, these methods should be used with caution. Incorrect changes to the registry or group policy can cause system issues. Always back up your system before making these changes.
Q. Do third-party tools for managing updates have any downsides?
While third-party tools can be convenient, they might introduce security risks if not from a reputable source. Always download such tools from trusted websites.
Q. How often should I check for updates if I disable automatic updates?
Check for updates at least once a month to ensure your system stays secure and up-to-date.
Was this helpful?
Introducing Bhaskar, your tech-savvy neighbor turned wordsmith extraordinaire. Over the past few years, Bhaskar has become the trusted authority for unraveling the mysteries of iOS, Android, macOS, and Windows. Armed with a B.Tech degree, he has dedicated himself to making technology easy to understand for everyone. His expertise shines through his contributions to well-known publications like Guiding Tech, iGeeksBlog, GeekFrost, and MakeUseOf (MUO). Bhaskar excels in creating straightforward how-to guides and comprehensive articles that make the complex tech landscape accessible to all. When he's not diving into the tech world, you'll find him enjoying music or indulging in sports.
